Midpoint Formula: Master It in Simple Steps!
The journey through coordinate geometry becomes remarkably straightforward once you grasp the midpoint formula. The formula itself is a tool much like a precision instrument in the hands of a skilled architect, such as Antoni Gaudí, who used geometric principles to design breathtaking structures. Consider the Cartesian plane; it is a landscape where the midpoint formula enables us to locate the exact center between any two points, simplifying complex spatial relationships. Educational institutions such as Khan Academy provide invaluable resources to solidify this concept, ensuring learners can confidently apply the midpoint formula in various mathematical contexts.
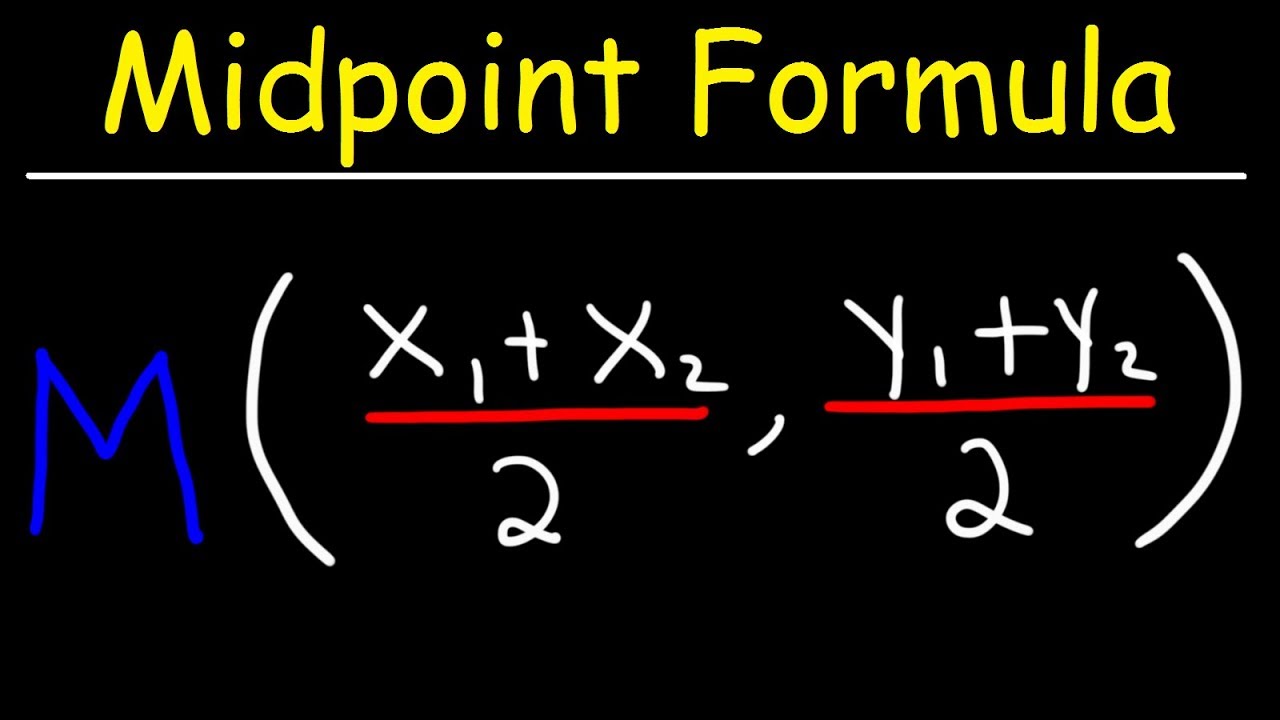
Image taken from the YouTube channel The Organic Chemistry Tutor , from the video titled Midpoint Formula .
Unlocking the Mystery of the Midpoint
Ever found yourself in that classic dilemma: you and a friend want to meet up, but you live on opposite sides of town? Where's the fairest meeting spot – the true middle ground? This seemingly simple question highlights a fundamental concept in mathematics and its real-world applications: finding the midpoint.
The Midpoint Formula: Your Secret Weapon
The Midpoint Formula is not some arcane mathematical ritual. It's an incredibly useful tool. It empowers you to pinpoint the exact center between two points. Think of it as your secret weapon for solving a variety of practical challenges.
Forget complicated jargon and intimidating equations for a moment. At its heart, the Midpoint Formula is about finding the average of two locations. It gives a precise answer every time!
Beyond Meeting Spots: Real-World Power
The applications of the Midpoint Formula extend far beyond coordinating coffee dates. Consider these diverse scenarios:
-
Construction: Ensuring structural integrity by finding the center of a beam.
-
Navigation: Calculating the halfway point on a journey. Optimize routes with more accuracy than before.
-
Design: Centering elements in graphic design or architecture. Create visually balanced and appealing layouts.
These are just a few examples. The underlying principle is the same: locate the precise middle. The Midpoint Formula provides that pinpoint accuracy, and the applications are limitless.
Fear Not: Mastering the Midpoint Is Within Reach
If the world of coordinates and formulas seems daunting, take heart! Mastering the Midpoint Formula is easier than you might think. We'll break down the process into manageable steps, revealing its simplicity and elegance. You will gain the confidence to tackle any midpoint problem that comes your way!
The Foundation: Understanding the Coordinate Plane
Unlocking the mystery of the midpoint requires a solid grasp of the environment where these points reside: the coordinate plane. Think of it as the address system for all things geometric. It’s where we plot points, draw lines, and ultimately, find those crucial midpoints. Let's delve into the essentials of this fundamental concept.
The Coordinate Plane: Your Geometric Map
The coordinate plane, at its heart, is a simple yet powerful tool.
It consists of two perpendicular lines: the x-axis (horizontal) and the y-axis (vertical).
The point where these axes intersect is called the origin, and it’s the zero point (0, 0) for our entire system.
These axes divide the plane into four regions, known as quadrants, each with its own unique combination of positive and negative values.
Cartesian Coordinates: Pinpointing Location
To locate a point on the coordinate plane, we use Cartesian coordinates, also known as ordered pairs.
These pairs are always written in the form (x, y), where x represents the point's horizontal distance from the origin (along the x-axis) and y represents its vertical distance (along the y-axis).
The order is crucial! (2, 3) is a completely different point from (3, 2).
This is why they are called "ordered pairs."
Coordinates: Decoding the Address
Each point on the plane has unique coordinates which are like a specific address.
Think of the x-coordinate as the "street number" and the y-coordinate as the "apartment number".
Together, they pinpoint the exact location of the point.
The X-Coordinate: Horizontal Position
The x-coordinate tells you how far to move horizontally from the origin.
A positive x-coordinate means moving to the right, while a negative x-coordinate means moving to the left.
The x-coordinate is also known as the abscissa.
The Y-Coordinate: Vertical Position
The y-coordinate tells you how far to move vertically from the origin.
A positive y-coordinate means moving upwards, while a negative y-coordinate means moving downwards.
The y-coordinate is also known as the ordinate.
Visualizing with Examples
To solidify these concepts, let's look at some examples.
Consider the point (3, 2). We start at the origin, move 3 units to the right along the x-axis, and then 2 units up along the y-axis. That's where our point lies.
What about (-1, 4)? We start at the origin, move 1 unit to the left along the x-axis, and then 4 units up along the y-axis.
These visual aids help make the abstract concept of coordinates more concrete.
Remember, a strong understanding of the coordinate plane is the key to confidently navigating the Midpoint Formula and other geometric concepts.
Defining the Line Segment
Before we can effectively find the midpoint, it's essential to define what we're finding the middle of. This brings us to the concept of a line segment: the straight path connecting two points on our familiar coordinate plane. Understanding its properties lays the groundwork for grasping the significance of the Midpoint Formula.
What is a Line Segment?
A line segment, in its simplest form, is a portion of a line that is bounded by two distinct endpoints. Unlike a line that extends infinitely in both directions, a line segment has a definite beginning and end. This characteristic allows us to measure its length and, crucially, locate its midpoint.
Connecting Points in the Coordinate Plane
Imagine any two points plotted on the coordinate plane. The line segment is the most direct route, the shortest distance, between those two points. It's a fundamental geometric shape that serves as the building block for more complex figures. The coordinates of these two points are crucial for applying the Midpoint Formula, as they define the segment's location and orientation.
The Midpoint Formula's Role
The Midpoint Formula provides a precise method for pinpointing the exact center of a line segment. It leverages the coordinates of the endpoints to calculate the coordinates of the midpoint.
Essentially, it averages the x-values and the y-values of the endpoints to find the middle ground. This eliminates guesswork and provides a reliable way to determine the central point of any line segment.
Visualizing Line Segments and Midpoints
To solidify your understanding, let's visualize a few examples. Consider a line segment with endpoints at (1, 2) and (5, 6). Imagine drawing this segment on the coordinate plane. The Midpoint Formula will tell us exactly where the middle of that line lies.
Consider another example with endpoints at (-2, -3) and (4, 1). Visualizing this segment, even with negative coordinates, helps reinforce the connection between the algebraic formula and the geometric representation.
Experiment with different pairs of points, drawing the line segments and mentally estimating where the midpoint should be. This visual exercise will build your intuition and make the Midpoint Formula even more intuitive.
Before we can effectively find the midpoint, it's essential to define what we're finding the middle of. This brings us to the concept of a line segment: the straight path connecting two points on our familiar coordinate plane. Understanding its properties lays the groundwork for grasping the significance of the Midpoint Formula.
The Midpoint Formula: Demystified
The Midpoint Formula might look intimidating at first glance, but it's simply a recipe for finding the exact middle point between two locations. The key lies in understanding that we're working with coordinates and finding the average of both the x and y values. Let's break it down.
The Formula Itself
Here it is, the star of the show:
Midpoint = ((x₁ + x₂)/2, (y₁ + y₂)/2)
Don't worry! We'll dissect it.
Understanding the Components
Coordinates, (x₁, y₁) and (x₂, y₂)
The values (x₁, y₁) and (x₂, y₂) represent the coordinates of the two endpoints of our line segment. Remember, each point on the coordinate plane is defined by an x-value and a y-value.
These subscripts (the little 1 and 2) are just there to help us distinguish between the two points. They don't indicate any mathematical operation on their own.
The Averaging Process
The heart of the Midpoint Formula is about finding the average.
Notice how we're adding the x-values (x₁ + x₂) and then dividing by 2? That's precisely how you calculate the average of two numbers.
We do the same thing with the y-values (y₁ + y₂)/2.
This means, we're calculating the average of the x-coordinates and the average of the y-coordinates, independently.
Putting it All Together
By averaging the x-coordinates and the y-coordinates separately, we get a new ordered pair, (xmidpoint, ymidpoint), which represents the midpoint of the line segment. This ordered pair is the exact location, the bullseye, right in the middle! Mastering this simple formula opens the door to solving a wide array of geometric and analytical problems.
Step-by-Step: Applying the Formula
[Before we can effectively find the midpoint, it's essential to define what we're finding the middle of. This brings us to the concept of a line segment: the straight path connecting two points on our familiar coordinate plane. Understanding its properties lays the groundwork for grasping the significance of the Midpoint Formula.
The Midpoint Formula... ]
...might seem intimidating at first, but with a systematic approach, it becomes a straightforward process.
Let's break down the application of the formula into manageable steps. Each step is crucial to finding the accurate midpoint between two given points. Let's begin!
Identify the Coordinates: The Starting Point
The first step is to clearly identify the coordinates of the two points that define the line segment. These are given as ordered pairs (x₁, y₁) and (x₂, y₂).
Carefully note down the x and y values for each point. This will prevent errors down the line!
Sum the X-Coordinates: Finding the Average X-Position
Next, we sum the x-coordinates: add x₁ and x₂. This sum represents the combined horizontal position of the two points. We will later be dividing this sum to pinpoint the center.
Sum the Y-Coordinates: Finding the Average Y-Position
Similarly, we sum the y-coordinates: add y₁ and y₂. This sum represents the combined vertical position of the two points. Just like with the x-coordinates, this sum will be averaged.
Divide by Two: Determining the Middle
Now comes the crucial step of finding the average. Divide each sum by 2. Specifically:
- Divide the sum of the x-coordinates by 2 to get the midpoint's x-coordinate.
- Divide the sum of the y-coordinates by 2 to get the midpoint's y-coordinate.
This division is the core of the midpoint formula. It identifies the exact middle value between the two coordinates in each dimension.
Write the Midpoint: Expressing the Result
Finally, express the result as an ordered pair (xmidpoint, ymidpoint). This ordered pair represents the coordinates of the midpoint.
It is the precise location exactly halfway between the two original points.
Example 1: A Simple Start
Let's consider two points: A(2, 4) and B(6, 8).
- Identify the Coordinates: x₁ = 2, y₁ = 4, x₂ = 6, y₂ = 8
- Sum the X-coordinates: 2 + 6 = 8
- Sum the Y-coordinates: 4 + 8 = 12
- Divide by Two: 8 / 2 = 4, 12 / 2 = 6
- Write the Midpoint: (4, 6)
Therefore, the midpoint of the line segment connecting (2,4) and (6,8) is (4, 6).
Example 2: Tackling Negative Numbers
Now, let's tackle a more challenging example: C(-3, 1) and D(5, -7).
- Identify the Coordinates: x₁ = -3, y₁ = 1, x₂ = 5, y₂ = -7
- Sum the X-coordinates: -3 + 5 = 2
- Sum the Y-coordinates: 1 + (-7) = -6
- Divide by Two: 2 / 2 = 1, -6 / 2 = -3
- Write the Midpoint: (1, -3)
The midpoint of the line segment connecting (-3, 1) and (5, -7) is (1, -3).
By following these steps methodically, you can confidently apply the Midpoint Formula to any pair of points, regardless of whether they are positive or negative. With practice, this process becomes second nature, providing a powerful tool for various geometric and practical applications.
Visualizing the Midpoint
Before we can effectively find the midpoint, it's essential to define what we're finding the middle of. This brings us to the concept of a line segment: the straight path connecting two points on our familiar coordinate plane. Understanding its properties lays the groundwork for grasping the significance of the Midpoint Formula. But even with the formula mastered, a crucial step remains: visualization. It's not just about getting the right answer, it's about seeing the answer in its proper context.
Visualizing the Midpoint Formula reinforces understanding, confirms accuracy, and builds a stronger intuition for geometric concepts.
The Power of the Coordinate Plane
The coordinate plane is more than just a grid; it's a visual representation of mathematical relationships. By plotting points and lines, we transform abstract equations into tangible forms.
Visualizing mathematical concepts helps increase understanding.
When working with the Midpoint Formula, the coordinate plane provides a framework to verify your calculations. Seeing the midpoint nestled precisely halfway between the two endpoints creates a sense of validation that a numerical answer alone cannot provide.
Plotting Points: From Numbers to Visuals
The first step in visualizing the midpoint is to accurately plot the original points on the coordinate plane. Each point, defined by its x and y coordinates, corresponds to a unique location on the grid.
Careful plotting ensures that your visual representation accurately reflects the problem. Once the endpoints are plotted, draw a line segment connecting them. This is the segment whose midpoint we seek.
Next, plot the coordinates of the calculated midpoint on the same coordinate plane.
Confirming the Result: A Visual Check
This is where the power of visualization truly shines. Does the plotted midpoint visually appear to be halfway between the two endpoints? Does it lie on the line segment you drew?
If it does, congratulations! You've not only calculated the midpoint correctly, but you've also confirmed your result through visual inspection.
If the midpoint appears to be off, this is a clear indication to re-check your calculations. Visualization serves as a powerful error-detection tool, saving you from submitting incorrect answers.
Tools for Visualization: Graph Paper and Beyond
While the principles of visualization remain the same, the tools we use can vary.
The Enduring Simplicity of Graph Paper
Graph paper offers a hands-on approach to visualizing the Midpoint Formula. Its pre-printed grid makes plotting points straightforward. Using a ruler, one can draw precise line segments and visually estimate the midpoint before even applying the formula. It provides a tactile and intuitive experience, especially beneficial for learners who prefer a hands-on approach.
Leveraging Technology: Graphing Software
For more complex scenarios or when precision is paramount, graphing software such as Desmos or GeoGebra offers invaluable assistance. These tools allow you to:
- Easily plot points and lines.
- Zoom in for detailed inspection.
- Quickly verify your calculations.
- Explore the Midpoint Formula dynamically.
By simply inputting the coordinates of the endpoints, graphing software can instantly display the line segment and its midpoint, offering a clear and accurate visual confirmation of your results. The use of color and interactive features can further enhance the visualization process, making it more engaging and informative.
In conclusion, visualizing the Midpoint Formula is more than just a supplementary step. It’s an integral part of the learning process that strengthens understanding, boosts confidence, and develops a deeper appreciation for the beauty and interconnectedness of mathematics.
Real-World Applications: Where the Midpoint Formula Shines
Before we can effectively find the midpoint, it's essential to define what we're finding the middle of. This brings us to the concept of a line segment: the straight path connecting two points on our familiar coordinate plane. Understanding its properties lays the groundwork for grasping the significance of the Midpoint Formula beyond abstract calculations. Let's explore how this seemingly simple formula becomes a powerful tool across various disciplines.
Navigation: Finding Your Way, Literally
Perhaps one of the most intuitive applications of the Midpoint Formula is in navigation. Imagine planning a road trip with a friend. You live in different cities, and you want to meet at a point that minimizes travel distance for both of you.
If you can represent your cities as points on a coordinate plane (using latitude and longitude, for example), the Midpoint Formula provides the coordinates of the ideal meeting spot – the halfway point.
This isn't just a theoretical exercise; mapping apps and GPS systems utilize similar calculations to determine optimal routes and estimate arrival times, considering various factors, but the underlying principle of finding the middle ground remains.
By using latitude and longitude, we can pinpoint any location on Earth's surface and accurately calculate the halfway point.
Geometry: Unveiling Hidden Properties
The Midpoint Formula plays a crucial role in solving a multitude of geometrical problems. One common application is finding the center of a rectangle or parallelogram.
Since the diagonals of these quadrilaterals bisect each other, their intersection point is the midpoint of each diagonal. By knowing the coordinates of the vertices (corners) of the rectangle, we can quickly determine the coordinates of its center using the formula.
This technique extends to other geometric shapes as well. Any symmetrical figure will have a well-defined center point that is calculated using the same procedure.
The simplicity of the Midpoint Formula allows for efficient calculation of geometric centers.
Analytic Geometry: Proofs and Deeper Insights
Analytic geometry bridges the gap between algebra and geometry, using coordinate systems to analyze geometric shapes and prove theorems. The Midpoint Formula becomes an essential tool in this realm.
For example, consider proving that the line segment joining the midpoints of two sides of a triangle is parallel to the third side and half its length. This is a classic theorem in geometry.
Using the Midpoint Formula to find the midpoints of the sides allows you to then calculate the slope of the line segment connecting them.
Comparing this slope and length to the third side, you can rigorously demonstrate the theorem's validity through algebraic manipulation and coordinate geometry principles.
The formula enables rigorous mathematical proofs of geometric theorems by translating geometric relationships into algebraic equations.
Beyond the Basics: Real-World Examples
The applications don't stop there. The midpoint has applications in construction.
The formula ensures symmetry and balance in designs, helping to locate the center of a bridge span or the central point of a circular structure. In computer graphics, the midpoint formula is used to determine the halfway point between two pixels when rendering lines.
These are just a few glimpses into the myriad ways the Midpoint Formula enhances our understanding of and interacts with the world around us.
Its simplicity masks a profound ability to solve practical problems across diverse fields.
Tools to Simplify Calculations
Finding the midpoint shouldn't be a chore. Thankfully, we live in an age where technology offers a helping hand. While understanding the formula is paramount, leveraging tools can streamline the process, especially when dealing with complex coordinates or repetitive calculations. This not only saves time but also reduces the chance of manual errors.
The Trusty Calculator: Your First Line of Defense
For calculations involving decimals, fractions, or negative numbers, a calculator is your best friend. Don't shy away from using one! A simple scientific calculator can handle the arithmetic involved in the Midpoint Formula quickly and accurately.
Pro-tip: Double-check your inputs to avoid errors. A misplaced digit can lead to a completely wrong answer.
Online Midpoint Calculators: Instant Verification
Numerous websites offer dedicated midpoint calculators. These tools are incredibly convenient for checking your work or quickly finding the midpoint when you only need the answer. Simply input the coordinates of the two endpoints, and the calculator instantly provides the midpoint.
However, a word of caution: Relying solely on these calculators without understanding the underlying formula can hinder your learning. Use them as a verification tool, not a replacement for understanding.
Spreadsheet Software: Power for Repetitive Tasks
For scenarios where you need to calculate the midpoints of multiple line segments, spreadsheet software like Excel or Google Sheets can be a lifesaver. These programs allow you to enter the formula once and then apply it to an entire column of data.
Setting Up Your Spreadsheet
- Column Headers: Create columns for x₁, y₁, x₂, y₂, xmidpoint, and ymidpoint.
- Enter Coordinates: Input the coordinates of your line segment endpoints into the corresponding columns.
- Enter the Formula: In the xmidpoint column, enter the formula
=(A2+C2)/2(assuming x₁ is in cell A2 and x₂ is in cell C2). Similarly, in the ymidpoint column, enter=(B2+D2)/2(assuming y₁ is in cell B2 and y₂ is in cell D2). - Apply the Formula: Drag the formula down to apply it to all the rows containing your data.
Benefits of Using Spreadsheets
- Efficiency: Calculate multiple midpoints with ease.
- Accuracy: Reduce the risk of manual calculation errors.
- Organization: Keep your data organized in a structured format.
By strategically integrating these tools into your problem-solving process, you can enhance your efficiency and accuracy, ultimately leading to a deeper understanding of the Midpoint Formula and its applications. Remember, tools are meant to augment your knowledge, not replace it.
Practice Makes Perfect
Finding the midpoint shouldn't be a chore. Thankfully, we live in an age where technology offers a helping hand. While understanding the formula is paramount, leveraging tools can streamline the process, especially when dealing with complex coordinates or repetitive calculations. This not only saves time but also reduces the potential for errors.
To truly cement your understanding of the Midpoint Formula, consistent practice is key. It's not enough to simply read through the examples; you need to actively engage with the material and apply the formula yourself. This section provides a range of practice problems designed to challenge you at different levels, along with answer keys for self-assessment.
The Importance of Practice Problems
Why is practice so crucial? Because it transforms theoretical knowledge into practical skill. By working through problems, you’ll not only solidify your understanding of the Midpoint Formula but also develop your problem-solving abilities. You'll learn to identify patterns, troubleshoot errors, and gain confidence in your ability to tackle any midpoint-related challenge.
A Variety of Practice Problems
We’ve curated a diverse set of problems to cater to different skill levels:
-
Beginner-Friendly: These problems involve simple coordinates with small, positive numbers. They are perfect for building a solid foundation and getting comfortable with the formula.
-
Intermediate: These problems introduce negative numbers, larger values, and decimals. They will challenge you to apply the formula in more complex scenarios.
-
Advanced: These problems involve fractions, variables, and real-world contexts. They will push you to think critically and apply your knowledge in creative ways.
Answer Keys for Self-Assessment
To facilitate your learning, each practice problem comes with a detailed solution. This allows you to immediately check your work and identify any areas where you might be struggling. Don't be discouraged if you make mistakes; instead, use them as opportunities to learn and improve. Carefully review the solutions and try to understand where you went wrong.
The Power of Visualization
While the Midpoint Formula is a powerful tool, it’s even more effective when combined with visualization. We strongly encourage you to use graphing tools to verify your solutions.
Utilizing Graphing Tools
Plot the original points and the calculated midpoint on graph paper or using graphing software like Desmos or GeoGebra. This will help you visually confirm that the midpoint is indeed located in the middle of the line segment. Seeing the formula in action can deepen your understanding and make the concept more intuitive.
Graphing Paper
By using graph paper, you can manually plot these points and visualize the midpoint, which can enhance your understanding of the relationship between the coordinates and the formula.
Graphing Software
Using interactive tools can make visualization even more insightful. Software can provide a dynamic representation, allowing you to manipulate the points and see how the midpoint changes in real-time.
Final Thoughts on Practicing
Remember, mastering the Midpoint Formula is a journey, not a destination. The more you practice, the more confident and proficient you will become. So, embrace the challenge, dive into the problems, and unlock your full potential!
Video: Midpoint Formula: Master It in Simple Steps!
FAQs About the Midpoint Formula
What exactly is the midpoint formula?
The midpoint formula helps you find the exact middle point between two points on a coordinate plane. Think of it as averaging the x-values and averaging the y-values to get the midpoint's coordinates. It’s a straightforward way to determine the center of a line segment.
What does it mean to average the x and y values in the midpoint formula?
Averaging the x-values means adding the x-coordinates of your two points and dividing by 2. Do the same for the y-coordinates. The resulting numbers become the x and y coordinates of your midpoint. The midpoint formula simply formalizes this averaging process.
If I know the midpoint and one endpoint, can I find the other endpoint using the midpoint formula?
Yes, you can! Think of the midpoint formula as an equation. If you know the midpoint and one endpoint, you can substitute those values into the formula and solve for the unknown x and y coordinates of the missing endpoint using algebraic manipulation.
Can the midpoint formula be used in three-dimensional space?
Absolutely. The midpoint formula easily extends to three dimensions. Simply add a z-coordinate to each point, and then average the z-coordinates just like you average the x and y coordinates. The resulting (x, y, z) point is the midpoint in 3D space.
So, there you have it! Mastering the midpoint formula doesn't have to be a headache. With these simple steps, you'll be finding the middle ground between any two points in no time. Now go forth and conquer those coordinate planes!