Isometric Circles Drawing: Easiest Guide Ever (Viral)
Mastering isometric circles drawing is easier than you think! The ellipse, a key concept in drafting, transforms into a perfect circle when viewed isometrically. Many designers use isometric graph paper to aid in accuracy when creating these drawings. Paul Laseau, a renowned author on technical drawing, highlights the importance of mastering this skill. Even if you're just starting out, understanding isometric circles drawing opens up a world of creative possibilities in technical illustration.

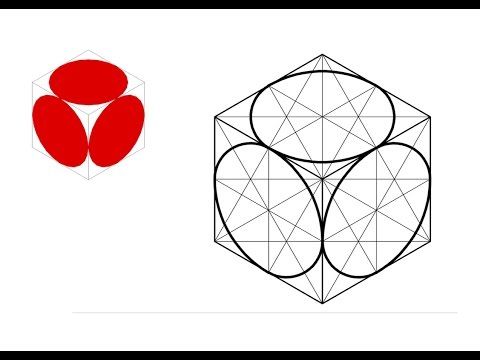
Image taken from the YouTube channel Derick Frederick , from the video titled TD - Application of Isometric Circles (Example 1) @derickfrederickTD .
Isometric circles: they might seem daunting at first, a technical hurdle for the artistically inclined. But what if I told you that mastering them unlocks a new dimension of creative expression?
This guide isn’t just about drawing circles; it's about opening doors to a world of visually stunning isometric designs.
Whether you're a seasoned designer, a budding artist, or simply a curious hobbyist, understanding how to accurately render circles in isometric projection is an invaluable skill.
Why Isometric Circles Matter
Imagine creating intricate architectural models, designing compelling game assets, or illustrating detailed technical diagrams, all with a distinctive and eye-catching perspective.
Isometric drawings have a unique visual appeal. They offer a sense of depth and three-dimensionality on a two-dimensional surface, captivating the viewer and drawing them into your creations.
Beyond aesthetics, isometric projection is incredibly practical. Architects use it for visualizing building designs. Engineers employ it for creating technical illustrations. Artists leverage it for adding depth and complexity to their work.
The applications are as diverse as your imagination allows.
What is Isometric Projection?
At its core, isometric projection is a method of visually representing three-dimensional objects in two dimensions.
Unlike perspective drawings that converge to a vanishing point, isometric projection uses parallel lines. All three axes (width, height, and depth) are equally foreshortened. They appear at 120-degree angles to each other.
This creates a consistent, measurable representation, making it ideal for technical illustrations and designs where accurate proportions are crucial.
Imagine looking at a cube head-on, but tilted so you can see three of its faces equally. That's the essence of isometric projection.
The Simplest Approach: Your Creative Key
The good news? Mastering isometric circles doesn't require advanced mathematical knowledge or complex tools.
This guide is designed to provide you with the easiest and most accessible method for drawing perfect isometric circles, even if you're a complete beginner.
We'll break down the process into simple, manageable steps. We will focus on understanding the underlying principles, and provide you with the tools and techniques you need to succeed.
Whether you're sketching by hand or using digital software, our approach will empower you to confidently create accurate and visually appealing isometric circles.
Get ready to unlock a new level of creative potential. Let's embark on this journey together!
Imagine looking at a cube head-on, but tilted so that you can see three of its faces equally. That, in essence, is the core idea behind isometric projection. But to truly harness its power, we need to delve deeper into its principles and applications.
Understanding Isometric Projection: The Foundation
Isometric projection might sound intimidating, but it's a surprisingly accessible and useful tool for artists, designers, and engineers alike. It offers a unique way to represent three-dimensional objects on a two-dimensional plane, and understanding its fundamental principles is crucial for mastering the art of drawing isometric circles.
Defining Isometric Projection
Isometric projection is a type of axonometric projection where all three axes of space are equally foreshortened, and the angles between them appear to be 120 degrees. This means that objects are displayed as if viewed along a diagonal, with no vanishing point distorting the proportions.
Unlike perspective drawings that mimic how our eyes perceive depth, isometric projection maintains parallel lines, ensuring that measurements remain consistent throughout the drawing. This makes it particularly useful for technical drawings and designs where accuracy is paramount.
Advantages and Applications
The beauty of isometric projection lies in its versatility. Its equal axis foreshortening provides a clear and measurable representation of objects. This has led to its widespread adoption across various fields.
-
Technical Illustrations: Engineers and architects use isometric drawings to create detailed technical illustrations of products, components, and building designs. The consistent measurements make it easier to communicate precise dimensions and specifications.
-
Architectural Designs: Architects use isometric drawings to visualize building designs, showcasing the overall structure and spatial arrangement of a building. This can be a powerful tool for communicating design ideas to clients and stakeholders.
-
Artistic Renderings: Artists leverage isometric projection to add depth and complexity to their work, creating visually engaging illustrations and designs. Its unique perspective offers a refreshing alternative to traditional perspective drawing.
-
Game Asset Creation: Game developers frequently use isometric projection to create game assets, particularly for strategy and simulation games. This allows them to represent game environments and characters in a clear and easily understandable way.
Isometric Projection and General Drawing Principles
While isometric projection has its specific rules and techniques, it's important to remember that it builds upon fundamental drawing principles. Understanding concepts like line weight, form, and shading will enhance your ability to create compelling isometric drawings.
Think of isometric projection as a specialized language within the broader field of visual communication. Just as learning grammar and vocabulary is essential for mastering a language, understanding basic drawing principles is crucial for effectively using isometric projection.
-
Practice with Basic Shapes: Start by practicing drawing simple isometric cubes, prisms, and pyramids. This will help you develop a feel for the angles and proportions involved.
-
Pay Attention to Line Weight: Varying line weight can add depth and visual interest to your drawings. Use thicker lines for outlines and thinner lines for internal details.
-
Experiment with Shading: Adding shading can further enhance the three-dimensionality of your isometric drawings. Consider the direction of light and use shading to create highlights and shadows.
By combining your understanding of general drawing principles with the specific techniques of isometric projection, you can unlock a new level of creative potential.
Imagine looking at a cube head-on, but tilted so that you can see three of its faces equally. That, in essence, is the core idea behind isometric projection. But to truly harness its power, we need to delve deeper into its principles and applications.
The Key to Success: Embracing Ellipses
Isometric projections provide a unique way to visualize three-dimensional objects on a two-dimensional surface. However, accurately representing circles in this style requires a slight shift in perspective. Instead of appearing as perfect circles, they transform into ellipses. Understanding why this happens and how to master the art of drawing ellipses is key to creating compelling isometric drawings.
Why Circles Become Ellipses
The transformation of a circle into an ellipse within an isometric projection stems from the viewing angle. In isometric projection, all three axes are equally foreshortened. This means that when we view a circle lying on one of these planes, it appears compressed along one axis, creating the elliptical shape.
Think of it like looking at a circular plate that is tilted away from you. As the plate tilts, its circular form seems to flatten and stretch. The more it tilts, the more pronounced the ellipse becomes.
This is precisely what happens in isometric projection. The equal foreshortening of the axes causes circles resting on those planes to be perceived as ellipses.
The Anatomy of an Ellipse
To accurately draw ellipses in isometric projection, a firm grasp of ellipse properties is crucial. The major axis is the longest diameter of the ellipse. The minor axis is the shortest diameter, bisecting the major axis at its midpoint.
Major Axis: The Longest Span
The major axis of an ellipse in isometric projection aligns with the diagonal of the isometric square that would contain the original circle. Its length is crucial for defining the overall width of your ellipse.
Minor Axis: The Height Indicator
The minor axis, perpendicular to the major axis, determines the ellipse’s height. Getting this dimension right is critical for preventing your circles from appearing distorted or out of proportion within the isometric drawing.
Understanding the relationship between these axes is fundamental for creating realistic-looking isometric circles.
Visualizing the Transformation
Seeing is believing. Visual aids are excellent tools for grasping the shift from circles to ellipses. Imagine a perfect circle inscribed within a square. Now, visualize tilting that square into an isometric view.
The square transforms into a rhombus, and the circle inside becomes an ellipse. Notice how the sides of the rhombus dictate the boundaries of the ellipse, and how the circle's diameter is now divided into a major and minor axis.
By comparing the original circle with its elliptical representation, you can begin to understand the spatial transformation that occurs in isometric projection. This will help you in creating more accurate and convincing drawings.
Step-by-Step Guide: Drawing Perfect Isometric Circles
Having explored the elliptical nature of isometric circles, let's translate that knowledge into practical application. This section provides a meticulously crafted, step-by-step guide to drawing these essential elements. With patience and practice, you'll be creating accurate and visually appealing isometric circles in no time.
Leveraging the Isometric Grid
The isometric grid is your best friend when embarking on this journey. It provides a pre-defined framework of angles, ensuring that your isometric drawings maintain consistent proportions.
The grid consists of a network of lines angled at 30 degrees from the horizontal. These lines represent the three axes in isometric projection.
By aligning your drawings with the grid, you avoid the pitfalls of inconsistent angles and distorted perspectives. It's the foundation upon which accurate isometric circles are built.
Constructing the Isometric Square
Before we can draw the ellipse, we need to create a square that will contain it. This isn't your typical square; it's an isometric square, also known as an isometric rhombus.
-
Determine the Circle's Diameter: Decide on the desired diameter of your circle. This will determine the side length of your isometric square.
-
Draw the Base Line: Using the isometric grid, draw a line segment corresponding to the diameter of your circle, aligning it with one of the 30-degree grid lines.
-
Construct the Sides: From each end of the base line, draw lines at 60 degrees relative to the base line (or use the other set of 30-degree grid lines). Make these lines equal in length to the base line.
-
Complete the Square: Connect the ends of the two lines you just drew to form the final side of the isometric square. This should also align with the grid.
The Ellipse Within: A Step-by-Step Process
Now comes the most crucial part: accurately drawing the ellipse within the isometric square. This is where patience and careful observation come into play.
-
Find the Midpoints: Locate the midpoint of each side of the isometric square. These midpoints will serve as key points for guiding your ellipse.
-
Draw Construction Lines: Lightly draw lines connecting each midpoint to the two opposite corners of the square. You should now have several intersecting lines within the square.
-
Identify the Four Centers: These lines will intersect at four points that will act as your ellipse construction centers. These points are crucial for accurately drawing the ellipse.
-
Draw the Arcs: Using a compass, set its radius to the distance between one of the centers and the midpoint of the nearest side of the square. Place the compass point on that center and draw an arc connecting the two adjacent midpoints. Repeat this process for each of the four centers, carefully connecting the arcs to form the ellipse.
-
Refine and Erase: Once you've drawn the arcs, carefully refine the shape of the ellipse, ensuring smooth transitions between the arcs. Erase any unnecessary construction lines.
Achieving Accuracy: Tips and Tricks
Precision is paramount when drawing isometric ellipses. Here are a few tips to help you achieve accurate results:
- Lightly Sketch First: Start with light, tentative lines. This allows you to easily correct mistakes and refine the shape before committing to darker lines.
- Use a Sharp Pencil: A sharp pencil ensures clean, crisp lines, making it easier to see and correct any inaccuracies.
- Practice Regularly: Like any skill, drawing isometric circles requires practice. The more you practice, the more natural and accurate your ellipses will become.
- Check for Symmetry: An accurate isometric ellipse should be symmetrical about its major and minor axes. Use your eye to check for any noticeable asymmetry and make adjustments accordingly.
Tools of the Trade
While a steady hand is essential, the right tools can significantly enhance your isometric drawing experience:
- Isometric Grid Paper: Pre-printed isometric grid paper eliminates the need to draw the grid yourself, saving time and ensuring accuracy.
- Ruler and Set Square: These tools are invaluable for drawing straight lines and accurate angles.
- Compass: A compass is essential for drawing the arcs that form the ellipse. Choose a compass with a fine adjustment mechanism for greater precision.
- Drafting Pencil: A drafting pencil allows for precise line weights and consistent shading.
- Eraser: A good eraser is essential for correcting mistakes and cleaning up construction lines.
Drafting and Sketching Techniques
Both drafting and sketching techniques can be used to create isometric circles. Drafting relies on precision and tools, while sketching emphasizes freehand drawing and artistic expression.
- Drafting: Employs precise measurements, tools like compasses and rulers, and a methodical approach to ensure accuracy.
- Sketching: Focuses on capturing the essence of the shape quickly and intuitively, often using lighter lines and a more freehand approach.
Experiment with both techniques to find what works best for you. You can even combine them, using drafting for the initial construction and sketching for the final refinement.
Having mastered the steps for drawing a single isometric circle, the real fun begins. It's time to move beyond theory and put your newfound knowledge into practice. Consistent practice is the cornerstone of skill development, and with isometric circles, the more you draw, the more intuitive the process becomes.
Practice Makes Perfect: Honing Your Skills
Drawing isometric circles, like any artistic or technical skill, demands practice. Don't be discouraged if your first attempts aren't perfect. Embrace the learning process, and with each circle you draw, you'll refine your technique and build confidence. The key is to approach practice with intention and focus.
The Importance of Varied Practice
To truly master isometric circles, it's essential to vary your practice.
-
Experiment with different sizes: Draw small circles, large circles, and everything in between. This helps you develop a feel for scaling the construction process.
-
Explore different positions: Isometric drawings often require circles on different planes. Practice drawing circles on all three isometric planes – top, front, and side – to become comfortable with any orientation.
-
Combine sizes and positions: Draw a scene with multiple isometric circles of varying sizes and positions to truly test and reinforce your learning.
This varied approach will solidify your understanding and enhance your ability to adapt to different drawing scenarios.
The Isometric Grid: Your Constant Companion
Throughout your practice, never underestimate the importance of the isometric grid. It's your guide, your anchor, and your assurance of consistent results. Every line you draw should be in relation to the grid. Use it to:
-
Accurately construct your isometric squares: The grid ensures that your squares are true rhombuses, maintaining the correct isometric projection.
-
Maintain consistent angles: Refer to the grid lines to ensure that your ellipse curves are smooth and symmetrical.
-
Check your work: Periodically compare your drawing to the grid to identify any deviations and correct them early on.
The isometric grid is not a crutch; it's a tool that enables precision and consistency. Embrace it.
Project Ideas to Fuel Your Practice
To make your practice more engaging and rewarding, consider working on small projects that incorporate isometric circles. Here are a few ideas to get you started:
-
Isometric Dice: A simple cube with circles representing the dots on each face. This project reinforces the concept of circles on different planes.
-
Isometric Gears: Draw a series of interlocking gears in an isometric view. This project challenges you to accurately position and size multiple circles in relation to each other.
-
Isometric Pipes: Create a network of pipes with circular cross-sections. This project involves drawing circles in various orientations and connecting them smoothly.
-
Isometric Buttons: Arrange some simple isometric buttons (like the ones on a shirt). This can test the ability to construct small circles accurately.
These projects provide a context for your practice, making it more meaningful and helping you develop a deeper understanding of how isometric circles are used in real-world drawings.
By consistently practicing with varied sizes and positions, relying on the isometric grid, and tackling engaging projects, you'll not only master the art of drawing isometric circles but also unlock a world of creative possibilities. So, grab your pencil, embrace the challenge, and let the practice begin!
Beyond the Basics: Expanding Your Isometric Horizons
Having honed your foundational skills in drawing isometric circles by hand, it’s natural to wonder where else this knowledge can take you. Fortunately, the journey doesn't end here. There are numerous avenues to explore, from leveraging digital tools to mastering more advanced isometric techniques.
The Digital Realm: Software for Isometric Precision
While the traditional method provides a solid understanding of the underlying principles, software can significantly accelerate your workflow and offer unparalleled precision.
Numerous computer-aided design (CAD) and graphic design programs, such as Adobe Illustrator, SketchUp, and AutoCAD, offer tools specifically designed for creating isometric drawings.
These tools often include features like:
-
Isometric grids that snap your lines and shapes into the correct orientation automatically.
-
Ellipse tools that allow you to create perfect isometric circles with just a few clicks.
-
3D modeling capabilities which can generate isometric views from 3D models.
Learning to use these programs can dramatically increase your productivity and open up new possibilities for complex and detailed isometric designs. Don't see software as a replacement for hand-drawing, but as a powerful complement to it.
Venturing into Different Isometric Views
The isometric view you've likely been practicing is just one of many. There are actually three primary isometric views, each rotated 120 degrees relative to the others.
Exploring these different views can offer new perspectives on your designs and allow you to create more dynamic and visually interesting compositions.
Experiment with rotating your isometric grid to see how different orientations affect the overall appearance of your drawings. Consider how the placement of your isometric circles changes depending on the view you choose.
Mastering all three isometric views will give you greater flexibility and control over your designs.
Blending Isometric Drawing with Perspective
While isometric projection is inherently non-perspectival (meaning parallel lines don't converge), combining it with elements of perspective can create incredibly compelling and realistic-looking illustrations.
For instance, you might use isometric projection for the primary structure of your design, but then add subtle perspective cues, such as:
-
Slightly reducing the size of objects as they recede into the distance.
-
Adding atmospheric perspective, where distant objects appear lighter and less detailed.
This hybrid approach allows you to maintain the precision and clarity of isometric projection while adding depth and realism to your designs.
It is a challenging but rewarding technique that can elevate your isometric drawings to a whole new level. Consider this as the next stage of development and proficiency of the craft.
Video: Isometric Circles Drawing: Easiest Guide Ever (Viral)
FAQs: Isometric Circles Drawing Guide
Here are some frequently asked questions about drawing isometric circles using our easy guide.
What's the easiest way to draw an isometric circle?
The easiest method involves first constructing an isometric square (rhombus) to act as a guide. Find the midpoints of each side, then use those points to draw lines to the opposite corners. These lines will intersect at points that serve as the centers for your isometric circle's arcs.
Why do isometric circles look like ellipses?
In isometric projection, circles appear as ellipses because they are being viewed at an angle. This perspective distortion makes the circular shape appear flattened. Mastering the isometric circles drawing involves accurately depicting this elliptical shape.
Can I use a compass to draw isometric circles?
Yes, you can use a compass, but you need to use the constructed isometric square and center points as reference. The isometric circles drawing technique relies on drawing four arcs of different radii from specific center points to form the elliptical shape.
Are there any shortcuts for drawing lots of isometric circles?
While the outlined method is the most precise, you can explore ellipse templates designed for isometric drawing. These templates provide pre-drawn ellipses for common isometric angles, speeding up the process for multiple isometric circles drawing in your project.
Alright, you've got the inside scoop on isometric circles drawing! Now go give it a shot and see what awesome stuff you can create. Happy drawing!