How to Draw an Isometric Circle: Easy Guide
Understanding how to draw an isometric circle is a fundamental skill in technical drawing, especially for those using tools from Staedtler or similar brands. Isometric projection, a method popularized in fields like architecture and engineering, allows for a three-dimensional representation of objects on a two-dimensional surface, where circles appear as ellipses; these ellipses demand precise construction, as taught in introductory CAD courses. The concept of isometric circles is crucial for accurately depicting objects when following guidelines established by organizations such as the American Society of Mechanical Engineers (ASME).
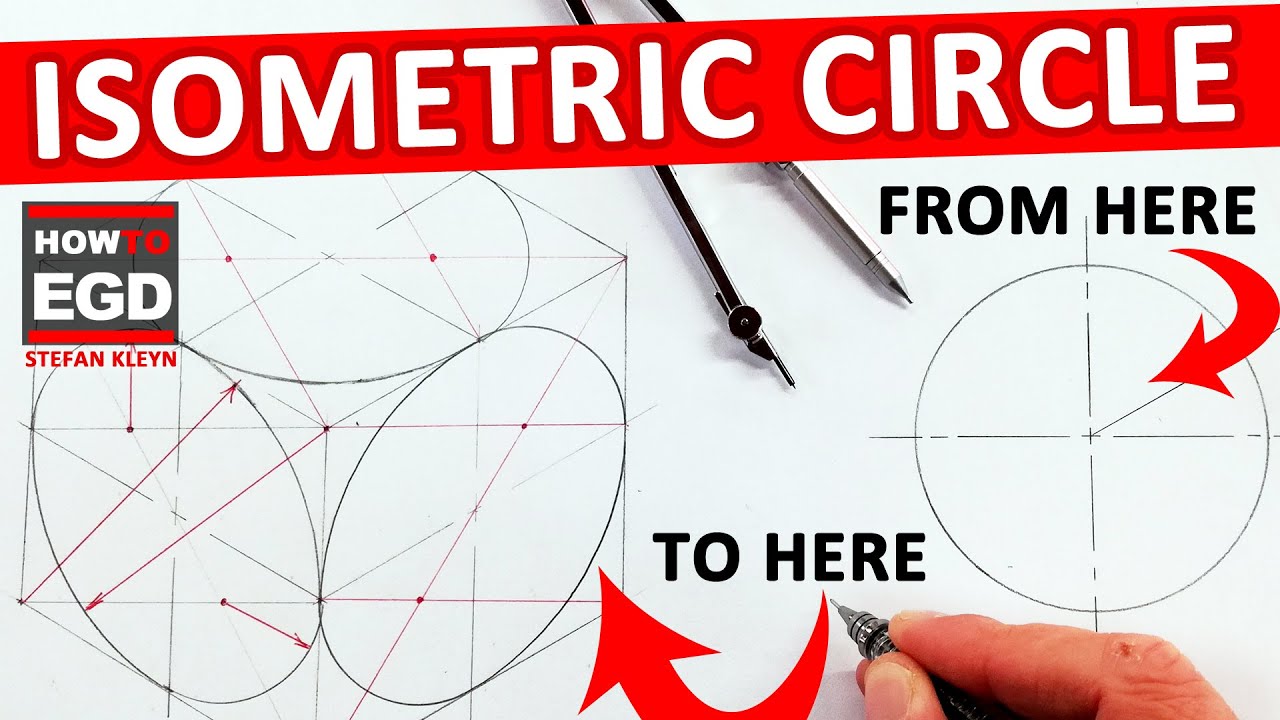
Image taken from the YouTube channel HowToEGD , from the video titled UNBELIEVABLE: EASIEST way to draw an ISOMETRIC CIRCLE!! .
Unveiling the Art of Isometric Circles: A Gateway to 3D Visualization
Welcome to the fascinating world where circles transform into ellipses! In technical drawing and 3D visualization, the ability to accurately represent circles in isometric projection is paramount. It's more than just drawing; it's about communicating spatial information clearly and effectively.
Let's embark on a journey to understand and master the art of isometric circles.
What is Isometric Projection?
Imagine holding a 3D object and rotating it so you can see three of its faces simultaneously. Isometric projection mimics this view on a 2D surface.
It’s a technique used to represent three-dimensional objects in two dimensions, maintaining the object's measurements along three axes. Think of it as a universal language for engineers, architects, and designers to communicate their ideas with precision.
The beauty of isometric projection lies in its simplicity and clarity. It allows for easy measurement and scaling along the isometric axes.
The Elliptical Illusion: Why Circles Become Ellipses
Now, here's where things get interesting. In the real world, a circle is, well, a circle.
However, when projected isometrically, that perfect circle transforms into an ellipse. Why? Because of the viewing angle! The circle is being viewed at an angle, causing it to appear foreshortened.
Think of holding a plate directly in front of you versus tilting it slightly away. As you tilt it, the circular plate starts looking like an ellipse. That’s essentially what's happening in isometric projection.
It's crucial to remember that this isn't a distortion, but a representation. The ellipse accurately represents the circle as seen from the isometric viewpoint.
The Ubiquitous Isometric Circle: Applications Across Industries
Isometric circles aren't just theoretical concepts; they're vital tools used across various fields.
-
Technical Drawings: Engineers use them to represent holes, cylinders, and other circular features in mechanical parts.
-
Architectural Design: Architects utilize them to depict curved elements in buildings and landscapes.
-
CAD and 3D Modeling: Designers incorporate them into CAD models for realistic 3D visualization.
-
Infographics: Isometric circles are used to represent data and objects in visually engaging ways.
From intricate machine parts to sprawling architectural designs, isometric circles play a critical role in accurately communicating complex spatial information.
Prepare for Take-off: A Step-by-Step Guide Awaits
Now that we've explored the theory behind isometric circles, it's time to get practical. We're about to embark on a step-by-step journey to constructing accurate isometric circles.
In the coming sections, we'll uncover the secrets of drawing ellipses using geometric techniques. Get ready to sharpen your pencils (or fire up your CAD software) and unlock your inner artist!
Understanding Isometric Projection: From 3D to 2D
After understanding the vital role isometric circles play, we must understand the underlying projection itself. This section delves deeper into the principles of isometric projection, explaining how it preserves measurements along three axes and what that means when drawing circles.
Let's unpack the intricacies of this essential technique, ensuring a solid foundation for creating accurate and visually compelling isometric drawings.
The Essence of Isometric Projection
Isometric projection is a type of axonometric projection, a method of visually representing three-dimensional objects in two dimensions. What sets isometric projection apart is its specific angle of projection.
Imagine tilting a 3D object so that all three of its principal axes are equally foreshortened.
This results in all three axes appearing at equal angles to each other.
This is crucial because it allows for measurements along these axes to be made directly, without the need for complex calculations.
Equal Angles and Foreshortening: The Hallmarks of Isometric
The term "isometric" literally means "equal measure." In isometric projection, all three axes are depicted at 120-degree angles to one another. This equal angular relationship is what allows for the preservation of scale along these axes.
However, it's important to note that while lengths along the isometric axes are true, the overall image is still foreshortened.
This means that the object appears slightly smaller than its actual size.
This foreshortening is uniform across all three axes, maintaining the proportionality of the object.
The Three Isometric Axes: A Foundation for 3D Representation
The foundation of any isometric drawing lies in the accurate depiction of the three isometric axes: X, Y, and Z. These axes represent the three dimensions of space – width, height, and depth – and are the reference lines for all measurements within the drawing.
Imagine a corner of a cube. Each edge represents one of these axes.
These edges are spaced 120 degrees apart, emanating from a single point.
This spatial arrangement creates the framework for representing 3D objects on a 2D plane.
Maintaining True Scale Along the Axes
One of the most significant advantages of isometric projection is that lengths along the isometric axes remain true to scale.
This means that if a line measures 5 units on the X-axis of the object, it will also measure 5 units on the X-axis of the isometric drawing. This characteristic simplifies the process of creating accurate representations of objects.
No need for complex conversions or calculations when measuring along the axes!
Isometric Scale: Understanding the Reduction
While lengths along the axes are true, remember that the overall image is foreshortened. This foreshortening leads to an isometric scale, which represents the ratio between the actual size of the object and its representation in the isometric drawing.
The isometric scale is approximately 82% (or more precisely, the square root of 2/3).
This means that the isometric drawing is about 82% of the actual size of the object.
However, since the measurements along the axes are true, we typically ignore this overall scale factor in practical drawing. We only need to remember that the final image is slightly smaller than reality.
The Ellipse: An Isometric Circle's Disguise
After understanding the vital role isometric circles play, we must understand the underlying projection itself. This section delves deeper into the principles of isometric projection, explaining how it preserves measurements along three axes and what that means when drawing circles.
Let's unpack the transformation from circle to ellipse and confront some common misconceptions.
Seeing is Believing: Visualizing the Transformation
The first step in truly understanding the isometric ellipse is to see the transformation. Imagine a cylinder viewed straight on. You see a perfect circle. Now, slowly tilt that cylinder.
As the angle changes, the circle morphs into an ellipse. In isometric projection, we're essentially viewing a circle at a specific, consistent angle. Diagrams showcasing this gradual change are invaluable for grasping the concept.
Projection, Not Distortion
It's crucial to internalize this: the ellipse isn't a distortion of the circle, but a projection of it. Think of it like a shadow. The shadow of a round plate isn't a "wrong" shape; it's a faithful representation of the plate from a specific viewpoint under certain lighting.
Similarly, the isometric ellipse is a true representation of the circle when viewed in isometric projection. It's about understanding the perspective, not the shape itself.
Busting Myths: Common Misconceptions
Several misconceptions often cloud the understanding of isometric circles.
One common error is assuming that you can simply "squash" a circle to create an ellipse. This approach rarely yields accurate results. Isometric ellipses have very specific dimensions that are mathematically related to the original circle's radius.
Another misconception is believing that all ellipses are suitable as isometric circles. Only ellipses with a particular ratio between their major and minor axes will work in isometric projections.
Finally, the incorrect belief that any CAD software generated ellipse is correct: one must always ensure that the resulting ellipse adheres to correct isometric angles and dimensions.
Major and Minor Axes: Decoding the Ellipse
Understanding the relationship between a circle's radius and the ellipse's major and minor axes is vital for accurate construction. In isometric projection, a circle's radius directly influences the dimensions of the resulting ellipse.
The major axis of the ellipse (its longest diameter) is equal to the diameter of the original circle.
The minor axis (its shortest diameter) is shorter than the circle's diameter and is equal to the diameter multiplied by the sine of 60 degrees, (approximately 0.866).
This fixed relationship allows us to accurately construct isometric ellipses by knowing the original circle's radius. In other words, the ellipse's major axis retains the true length while the minor axis is foreshortened to maintain correct isometric representation.
Geometric Construction: Your Step-by-Step Guide to Isometric Ellipses
After understanding the vital role isometric circles play, we must move to how to project them. This section provides a practical, step-by-step guide to drawing isometric ellipses using geometric construction techniques.
Let's unpack the transformation!
Step 1: Drawing the Isometric Axes
This is the foundational step. You'll begin by establishing your three isometric axes: X, Y, and Z.
These axes originate from a single point and radiate outwards at 120-degree angles from each other.
Think of it as dividing a circle into three equal parts.
The Y-axis typically points vertically upwards, while the X and Z axes extend diagonally to the left and right, respectively.
Accuracy is paramount here, as even slight deviations can distort the final ellipse.
Step 2: Creating an Isometric Square/Rhombus
Next, we'll construct a rhombus that will serve as the boundary for our ellipse.
Imagine a square viewed from an isometric perspective; it transforms into a rhombus.
Using the desired diameter of your isometric circle, measure and mark equal distances along the X and Z axes from the origin.
From these points, draw lines parallel to the X and Z axes, forming the rhombus.
Remember, all sides of the rhombus must be equal in length.
Step 3: Locating the Center Point of the Rhombus
This step is simple but crucial. The center point of the rhombus is the geometric center of your ellipse and the center of the circle it represents.
To find it, simply draw diagonals connecting opposite corners of the rhombus.
The point where these diagonals intersect is your center point.
Double-check this point, as any inaccuracy here will shift the ellipse off-center.
Step 4: Constructing the Ellipse within the Rhombus using the "Four-Center" Method
Understanding the Four-Center Method
This is a popular and reliable technique for drawing isometric ellipses. It relies on finding four key points within the rhombus from which to draw arcs.
These arcs seamlessly blend to create the elliptical shape.
Finding the Four Centers
- Identify the acute angles: Locate the two sharper (acute) angles of your rhombus.
- Find the midpoints: From each acute angle, draw lines to the midpoint of the opposite sides.
- Locate the two additional centers: These lines will intersect at two points inside the rhombus. These are two of your four centers.
- Determine the last two centers: The acute angles of the rhombus themselves are the final two centers.
Drawing the Arcs
- Using the acute angle vertices: Place the compass point at one of the acute angle vertices and draw an arc that extends from one midpoint to the other. Repeat for the opposite acute angle.
- Using the internal intersection points: Position the compass point at one of the intersection points located inside the rhombus. Adjust the compass radius to reach the end of the arc you just drew. Draw an arc to connect the two adjacent arcs. Repeat for the opposite intersection point.
With these four arcs complete, you should have a convincing elliptical shape within the rhombus.
Step 5: Refining the Ellipse for a Smooth and Accurate Representation
Smoothing the Transitions
Examine your ellipse closely.
Are there any abrupt transitions between the arcs?
If so, gently refine these areas using a smooth, continuous line to create a seamless curve.
Ensuring Symmetry
An accurate isometric ellipse should be symmetrical about both its major and minor axes.
Visually inspect your ellipse to ensure that it appears balanced.
Correcting Imperfections
Don't be afraid to erase and redraw sections of the ellipse to correct any imperfections.
Practice makes perfect, so don't get discouraged if your first attempt isn't flawless. With careful attention to each step, you'll soon be drawing accurate isometric ellipses with confidence.
Mastering the Ellipse: Axis, Angles, and Accurate Measurement
Geometric Construction: Your Step-by-Step Guide to Isometric Ellipses. After understanding the vital role isometric circles play, we must move to how to project them. This section provides a practical, step-by-step guide to drawing isometric ellipses using geometric construction techniques.
Let's unpack the transformation!
But how do we ensure our isometric ellipses aren't just approximations, but accurate representations? The secret lies in mastering the placement of the axes, controlling those pesky angles, and understanding the subtle geometry that governs this transformation. Let's dive in!
Precisely Defining the Major and Minor Axes
The major and minor axes are the skeletal framework upon which your ellipse is built. A slight miscalculation here can throw off the entire drawing. So, how do we pinpoint their exact locations?
First, remember that in an isometric projection, the circle is foreshortened equally along two axes. The major axis aligns with the longest diagonal of the isometric square (rhombus), representing the diameter of the original circle as seen from that isometric view.
The minor axis, on the other hand, is perpendicular to the major axis, running through the center point of the rhombus. Its length represents the foreshortened diameter of the circle. Accurate placement of these axes is paramount.
Use your ruler and set square meticulously to find the exact midpoints of the rhombus's sides and connect them accurately to find the ellipse's center.
Conquering the 30-Degree Angle
The 30-degree angle is a cornerstone of isometric projection. It dictates the angle at which the isometric axes diverge, and it's critical for constructing the rhombus that houses the ellipse.
Using a protractor or a set square with a 30-degree angle, carefully draw the isometric axes emanating from the center point.
Ensure they are precisely 120 degrees apart, which translates to each axis being 30 degrees from the horizontal. Inaccurate angles will distort the rhombus and, consequently, the ellipse.
Take your time, double-check your measurements, and don't hesitate to redraw if necessary. The pursuit of accuracy is worth the effort.
Avoiding Common Pitfalls in Ellipse Construction
Even with a solid understanding of the axes and angles, certain errors can creep into your isometric ellipses. Let's address some common culprits:
-
Freehanding: Resist the urge to sketch the ellipse freehand, especially in technical drawings. Use the geometric construction method religiously for accuracy.
-
Uneven Curves: Ensure the ellipse's curves are smooth and symmetrical. Uneven curves often indicate errors in the initial rhombus construction or the ellipse-drawing process itself. A wobbly ellipse screams inaccuracy.
-
Ignoring Symmetry: The ellipse should be symmetrical about both its major and minor axes. If it appears skewed or lopsided, revisit your construction steps.
-
Overly Pointed Ends: Avoid creating sharp points at the ends of the major axis. The ellipse should gently curve to meet the axis.
Unveiling the Secrets of Focal Points
While not directly involved in the basic construction of an isometric ellipse, understanding the focal points can deepen your appreciation of its geometry. The focal points are two specific points within the ellipse.
Their mathematical relationship to the ellipse determines its shape. An ellipse can be defined as the locus of points such that the sum of the distances to the two focal points is constant.
While you might not need to explicitly locate them for drawing purposes, knowing about the focal points reinforces the underlying geometric principles and can aid in visually verifying the accuracy of your ellipse.
By focusing on accurate axis placement, precise angle measurement, and mindful construction techniques, you can elevate your isometric ellipses from mere approximations to accurate and visually pleasing representations. Happy drawing!
Tools of the Trade: Essential Instruments for Isometric Drawing
Mastering the Ellipse: Axis, Angles, and Accurate Measurement Geometric Construction: Your Step-by-Step Guide to Isometric Ellipses. After understanding the vital role isometric circles play, we must move to how to project them. This section provides a practical overview of the essential manual and digital tools for bringing your isometric visions to life. Choosing the right instruments can significantly impact the accuracy, efficiency, and overall enjoyment of your drawing process.
Let's explore the classic, tactile world of manual tools, as well as the powerful, precise realm of digital design, noting the advantages each brings to the table.
Manual Tools: The Tactile Foundation
For many, the art of isometric drawing begins with the touch and feel of traditional tools. These instruments offer a direct connection to the creative process, fostering a deeper understanding of spatial relationships.
The Humble Pencil: Your Primary Instrument
The pencil is arguably the most fundamental tool. The choice of pencil can heavily impact the outcome.
Consider using a range of hardnesses, from harder pencils (2H-4H) for light construction lines that are easily erased, to softer pencils (HB-2B) for darker, more defined lines.
This allows for controlled line weights, adding depth and clarity to your drawings.
The Ruler: Precision is Key
Accuracy is paramount in isometric drawing, and a reliable ruler is your best friend. Look for a ruler with clearly marked graduations, preferably in millimeters and inches, to ensure precise measurements.
A metal ruler can be advantageous, providing a straight edge and preventing wear over time. Transparent rulers allow you to see the drawing beneath, which can be helpful when aligning lines.
The Eraser: A Necessary Companion
Mistakes are inevitable, and a good eraser is essential for correcting them. A kneaded eraser is ideal for lifting graphite without damaging the paper, while a plastic or vinyl eraser is better for removing darker lines.
Using an eraser shield can help isolate specific areas for erasing, preserving the surrounding details.
Paper: The Canvas for Your Vision
The choice of paper can significantly impact the quality of your drawings. Smooth, high-quality paper is recommended for precise line work. Heavier weight paper can also prevent ink from bleeding if you choose to ink your drawings later.
Consider using graph paper or isometric grid paper to aid in maintaining accurate angles and proportions.
The Compass: Mastering Circular Forms
While circles appear as ellipses in isometric projection, a compass is still vital for constructing the rhombus that defines the ellipse. A high-quality compass with a fine point will allow for accurate and consistent arcs and circles.
Investing in a beam compass may be helpful for drawing larger ellipses.
Digital Tools: Precision and Efficiency Redefined
In today's design landscape, digital tools offer unparalleled precision, flexibility, and efficiency. CAD (Computer-Aided Design) software has become the industry standard for technical drawing, and for good reason.
CAD Software: The Digital Drafting Table
CAD software provides a virtual drafting table, allowing you to create and manipulate isometric drawings with incredible accuracy. Programs like AutoCAD, DraftSight, and SketchUp offer specialized features for isometric projection, including isometric grids, ellipse tools, and object snapping.
Advantages of CAD:
- Precision: CAD allows you to define measurements with extreme accuracy, eliminating human error.
- Efficiency: CAD software streamlines the drawing process, automating repetitive tasks and making revisions easy.
- Flexibility: Digital drawings can be easily scaled, copied, and modified without affecting the original.
- Collaboration: CAD files can be easily shared and collaborated on with other designers and engineers.
Basic Techniques in CAD:
Start by setting up an isometric grid in your CAD software. Then, use the ellipse tool to draw isometric circles. Familiarize yourself with object snapping features to ensure precise connections between lines and objects.
Layer Management:
Utilizing layers in CAD is an important aspect of CAD. Effective layer management is critical for organizing complex drawings. Assign different elements (e.g., construction lines, outlines, dimensions) to separate layers, allowing you to control their visibility and properties independently.
3D Visualization Software: Bringing Your Designs to Life
While CAD is primarily used for 2D drafting, 3D visualization software takes your designs to the next level, allowing you to create realistic renderings and animations.
Programs like Blender, 3ds Max, and Cinema 4D can import CAD models and add materials, textures, and lighting, creating compelling visualizations that communicate your designs effectively.
Integration with CAD:
The seamless integration between CAD and 3D visualization software allows you to iterate on your designs quickly and efficiently, moving from technical drawings to stunning visuals with ease.
Practical Applications: Where Isometric Circles Shine
Tools of the Trade: Essential Instruments for Isometric Drawing Mastering the Ellipse: Axis, Angles, and Accurate Measurement Geometric Construction: Your Step-by-Step Guide to Isometric Ellipses. After understanding the vital role isometric circles play, we must move to how to project them. This section provides a practical overview of the essential fields where accurate isometric circles aren't just aesthetically pleasing, but crucial for clear and effective communication. From the precision of engineering blueprints to the compelling visuals of product design, let's explore the diverse applications where these seemingly simple ellipses truly shine.
Technical Drawing: The Foundation of Engineering and Architecture
Isometric projection holds a venerable position in technical drawing, especially in engineering and architecture. It allows professionals to represent 3D objects on a 2D plane while preserving essential dimensional information.
In these fields, clarity is paramount. Isometric drawings offer a straightforward way to visualize components, assemblies, and architectural designs. The correct rendering of circles, which frequently appear as holes, cylinders, or rounded features, is non-negotiable. Incorrectly drawn circles can lead to misinterpretations, costing time, money, and potentially compromising safety.
CAD Design: Efficiency, Accuracy, and Seamless Integration
Computer-Aided Design (CAD) software has revolutionized the creation and manipulation of isometric drawings. CAD allows for the rapid generation of precise isometric views. Correctly defined circles and ellipses are fundamental to the efficiency of this process.
Furthermore, CAD software facilitates seamless integration with other design and manufacturing processes. Isometric drawings created in CAD can be easily incorporated into technical documentation, simulations, and even manufacturing instructions.
2D Representation of 3D Objects: Visualizing the Complex
One of the core strengths of isometric projection is its ability to convey a sense of three-dimensionality in a two-dimensional format. Isometric circles play a vital role in achieving this illusion.
By accurately representing circles as ellipses, we can effectively communicate the form and spatial relationships of objects. This is invaluable in scenarios where a fully rendered 3D model isn't necessary, or when a simplified visual representation is preferred for clarity.
3D Visualization: Communicating Spatial Information
While fully rendered 3D models offer the most realistic representation of objects, isometric drawings still hold relevance in 3D visualization. They can be used to create simplified diagrams, exploded views, or instructional illustrations.
In these contexts, accurately rendered isometric circles contribute significantly to the overall clarity and comprehensibility of the visualization. They help viewers quickly grasp the shape and orientation of components, even without the visual cues provided by shading and perspective.
Visual Communication: Conquering Complexity with Clarity
Beyond purely technical applications, isometric drawings are powerful tools for visual communication in a wider range of contexts. They can be used to create infographics, diagrams, and illustrations for educational materials, marketing materials, and user manuals.
In these cases, isometric circles contribute to the overall aesthetic appeal and professional look of the visuals. But more importantly, they ensure that the information is conveyed accurately and unambiguously, even to viewers without specialized technical knowledge.
Advanced Techniques: Beyond the Basics
Having mastered the fundamentals of constructing isometric circles and ellipses, you're now equipped to venture into more sophisticated applications of isometric drawing. This section serves as a stepping stone, introducing advanced techniques that can elevate your isometric illustrations from basic representations to detailed and expressive visuals. Think of it as unlocking the next level, where creative possibilities truly expand.
Drawing Isometric Arcs and Curves
Moving beyond complete circles, the ability to accurately render isometric arcs and curves is crucial for depicting objects with rounded edges or flowing forms. Isometric arcs are simply portions of isometric ellipses, but their construction requires careful attention to ensure they seamlessly blend with surrounding lines and curves.
Determining the correct ellipse and identifying the relevant segment can be challenging, but with practice, you’ll develop an intuition for visualizing these complex shapes in isometric space. Consider breaking down complex curves into smaller, manageable arc segments.
Creating Isometric Projections of Complex Shapes
While drawing a single isometric circle is relatively straightforward, projecting more intricate objects composed of numerous curves and forms presents a more significant challenge. This requires breaking down the object into simpler geometric primitives, projecting each primitive individually, and then assembling them to form the complete object.
Think of it as building with Lego bricks, where each brick represents a simple isometric shape. Careful planning and precise execution are essential to avoid distortions and maintain spatial accuracy.
Using Isometric Grids for Efficient Drawing
An isometric grid is a pre-drawn network of lines aligned with the three isometric axes. This grid provides a visual guide for accurately positioning lines, circles, and other elements within the isometric projection.
Using an isometric grid can dramatically speed up the drawing process and ensure consistent proportions. You can create your own isometric grids using CAD software or find pre-made templates online.
Isometric grids are particularly helpful when creating repetitive patterns or complex assemblies. Experiment with different grid spacings to find what works best for your projects.
Combining Isometric and Perspective Views
While isometric projection offers a clear and measurable representation of objects, it can sometimes appear somewhat sterile due to the absence of perspective foreshortening. A powerful technique is to combine isometric and perspective views in a single illustration.
This can create a more visually appealing and realistic depiction. For instance, you might use an isometric projection for the main object and then add perspective elements, like a background scene or shadows, to enhance the sense of depth and spatial context.
Understanding how to effectively integrate these two projection methods opens up a world of creative possibilities. It requires a solid understanding of both isometric and perspective principles, as well as a keen eye for visual composition.
Video: How to Draw an Isometric Circle: Easy Guide

FAQs: How to Draw an Isometric Circle: Easy Guide
What is an isometric ellipse and why is it important?
An isometric ellipse is the 2D representation of a circle when drawn in an isometric projection. It's crucial because circles appear as ellipses in isometric drawings. Understanding how to draw an isometric circle correctly ensures your isometric drawings accurately depict circular objects.
Can I use a regular compass to draw an isometric circle?
No, a standard compass will draw a perfect circle, not an ellipse. You need specific methods, like the four-center method or using isometric graph paper, to accurately construct the elliptical shape that represents a circle in isometric projection. These methods are key to understanding how to draw an isometric circle.
What are the axes I need to consider when drawing an isometric circle?
You'll primarily consider the isometric axes, typically at 30 degrees from the horizontal. These axes define the orientation of your isometric square/rhombus, within which you'll construct the isometric ellipse. When learning how to draw an isometric circle, visualize the circular shape within this rhombus.
What if I need to draw an isometric circle on a face that isn't aligned with the main axes?
You'll first need to establish the isometric axes for that specific face. Rotate your isometric square/rhombus accordingly. This rotated plane then becomes the foundation for constructing your isometric ellipse. Essentially, you adapt the fundamental process of how to draw an isometric circle to a new orientation.
So, that's it! With a little practice, drawing an isometric circle will become second nature. Don't get discouraged if your first few attempts are a little wonky. Just keep experimenting with those ellipses and guidelines, and you'll be drawing isometric circles like a pro in no time. Happy creating!