How Does Dilution Reduce Concentration? Guide
Dilution, a fundamental technique in chemistry, decreases the concentration of a solution by adding more solvent. Molarity, a common unit of concentration in laboratories, is directly impacted by the dilution process, decreasing as the volume of solvent increases. Titration experiments frequently employ dilution to achieve precise concentrations with the use of calibrated glassware, ensuring accurate reaction analyses. Therefore, understanding how does dilution reduce concentration is essential for chemistry students and professionals alike, guaranteeing precise results in experiments and applications.
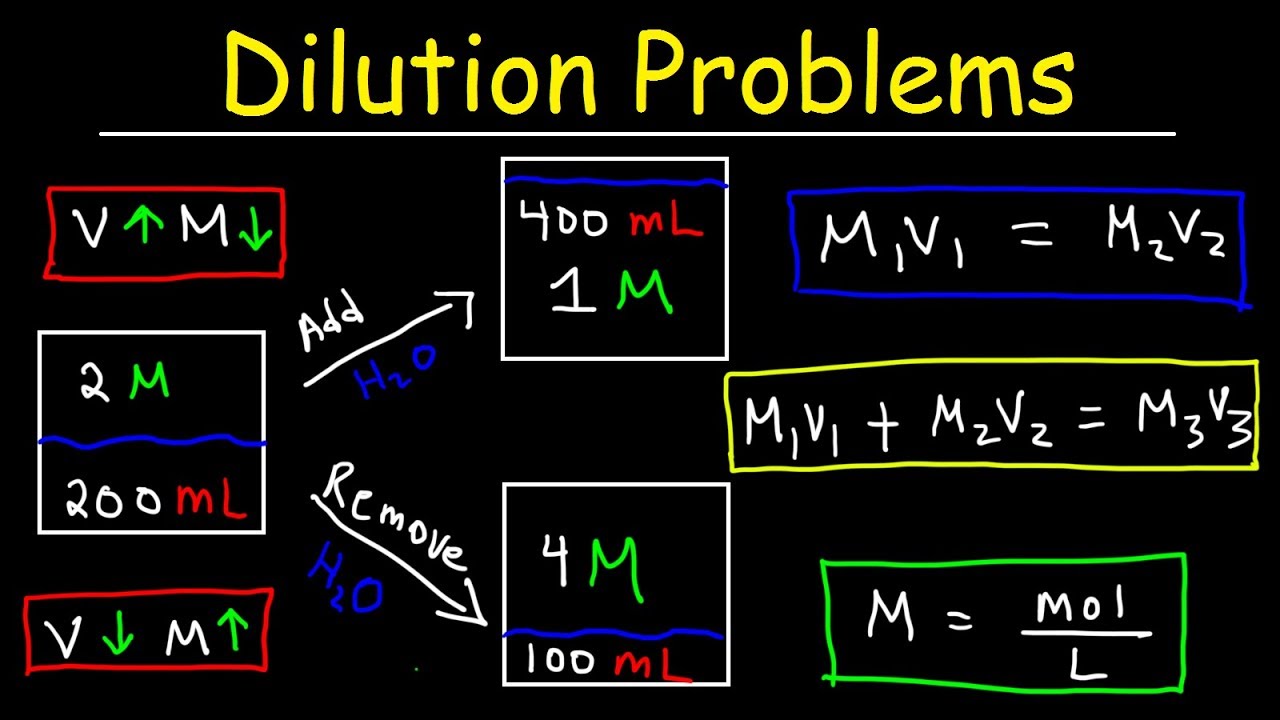
Image taken from the YouTube channel The Organic Chemistry Tutor , from the video titled Dilution Problems, Chemistry, Molarity & Concentration Examples, Formula & Equations .
In the realm of quantitative chemistry, the ability to accurately prepare and manipulate solutions is paramount. This hinges on understanding the fundamental concepts of concentration and dilution. These concepts not only allow chemists to precisely control reaction conditions, but are also essential in various fields, from medicine to environmental science.
Let's embark on a journey to explore these foundational ideas, setting the stage for mastering the techniques used to manipulate solutions.
Defining Concentration: The Essence of a Solution
At its core, concentration describes the amount of a substance (the solute) present in a given amount of another substance (the solvent) or solution. It is a quantitative measure, indicating the relative proportion of solute to solvent.
Understanding concentration is critical in chemistry because it dictates the behavior of solutions in chemical reactions and other processes. By knowing the concentration, chemists can accurately predict reaction rates, equilibrium positions, and other key parameters.
The Solution Trio: Solute, Solvent, and Solution
To fully grasp concentration, we must first understand the roles of solute, solvent, and solution. The solute is the substance that is dissolved, while the solvent is the substance doing the dissolving. Together, they form a solution.
Think of salt dissolving in water: salt is the solute, water is the solvent, and saltwater is the solution. The concentration of the saltwater would then reflect the amount of salt present in a specific volume of water.
The interplay between these three components directly determines the concentration of a solution, which in turn affects its properties and behavior.
Beyond the Lab: Real-World Applications
The principles of dilutions and concentrations extend far beyond the chemistry laboratory. In medicine, precise dilutions are crucial for preparing accurate drug dosages.
In environmental science, these concepts are used to measure pollutants in water and air samples. Even in everyday life, understanding concentrations helps us prepare the perfect cup of coffee or mix cleaning solutions safely.
By mastering these fundamental concepts, we unlock a deeper understanding of the world around us, paving the way for success in a wide range of scientific and practical endeavors.
Understanding the Components of a Solution: Solute, Solvent, and Solution Interactions
In the realm of quantitative chemistry, the ability to accurately prepare and manipulate solutions is paramount. This hinges on understanding the fundamental concepts of concentration and dilution. These concepts not only allow chemists to precisely control reaction conditions, but are also essential in various fields, from medicine to environmental science. To fully grasp these concepts, a foundational understanding of the components that make up a solution – the solute, the solvent, and their interactions – is indispensable.
Defining the Solute: The Dissolved Substance
The solute is the substance that is dissolved in another substance, known as the solvent, to form a solution. It's the component present in a lesser amount relative to the solvent. Identifying the solute is often straightforward, but can be more complex in some scenarios.
Common examples of solutes abound in everyday life and laboratory settings. Salt (NaCl) dissolving in water to create a saline solution is a classic illustration. Similarly, sugar dissolving in coffee or tea exemplifies the solute role of sugar. In analytical chemistry, a reagent being dissolved in a suitable solvent to create a working standard solution illustrates this concept.
The Solvent: The Dissolving Medium
The solvent is the substance that dissolves the solute, forming a solution. It is typically present in a greater quantity than the solute. The solvent is the environment in which the solute molecules are dispersed.
Water (H₂O) is often referred to as the "universal solvent" due to its ability to dissolve a wide range of substances. Ethanol, commonly used in tinctures and disinfectants, is another prevalent solvent. Acetone, frequently employed as a cleaning agent and nail polish remover, is a further example of a solvent with distinct properties. The choice of solvent is a crucial consideration, determined by the solute's properties and desired application of the solution.
Solute-Solvent Interactions: Forming a Homogeneous Solution
The interaction between the solute and solvent at the molecular level is what determines whether a solution will form. A solution is a homogeneous mixture, meaning that the solute is evenly distributed throughout the solvent. This even distribution occurs because of attractive forces between solute and solvent particles.
The nature of these interactions dictates the solubility of the solute in the solvent. "Like dissolves like" is a useful rule of thumb, suggesting that polar solutes dissolve well in polar solvents (e.g., water), while nonpolar solutes dissolve well in nonpolar solvents (e.g., hexane). When the intermolecular forces between the solute and solvent are strong enough to overcome the solute-solute and solvent-solvent interactions, the solute will dissolve, leading to the formation of a homogeneous solution.
Factors Affecting Solubility: Temperature and Pressure
The solubility of a solute in a solvent isn't a fixed property. It's influenced by external factors, most notably temperature and, in the case of gaseous solutes, pressure.
-
Temperature often plays a significant role. Generally, the solubility of solid solutes in liquid solvents increases with increasing temperature. Conversely, the solubility of gases in liquid solvents typically decreases with increasing temperature.
-
Pressure has a noticeable effect primarily on the solubility of gases. According to Henry's Law, the solubility of a gas in a liquid is directly proportional to the pressure of the gas above the liquid. Increasing the pressure forces more gas molecules into the solution.
Understanding how temperature and pressure affect solubility is crucial in many chemical and industrial processes.
Units of Concentration: Molarity, Molality, PPM, and More
With a firm grasp on the components of a solution, we can now explore the diverse ways in which concentration is expressed. Choosing the right unit is crucial for accurate communication and calculations in various scientific contexts. Let's delve into the most common units and their specific applications.
Molarity (M): Moles per Liter
Molarity (M) is perhaps the most widely used unit of concentration in chemistry. It is defined as the number of moles of solute per liter of solution. This unit is particularly useful when dealing with stoichiometric calculations, as it directly relates the amount of solute to the volume of the solution.
Calculating Molarity
Molarity is calculated using the following formula:
Molarity (M) = Moles of solute / Liters of solution
Example:
What is the molarity of a solution prepared by dissolving 4.0 grams of NaOH in enough water to make 500 mL of solution?
- Convert grams of NaOH to moles: (4.0 g NaOH) / (40.0 g/mol NaOH) = 0.10 mol NaOH
- Convert mL of solution to Liters: 500 mL / 1000 mL/L = 0.500 L
- Calculate Molarity: M = (0.10 mol NaOH) / (0.500 L solution) = 0.20 M
Molality (m): Moles per Kilogram
Molality (m) expresses concentration as the number of moles of solute per kilogram of solvent. Unlike molarity, molality is temperature-independent because it relies on mass rather than volume, which can change with temperature.
Molarity vs Molality
The key difference lies in the denominator: molarity uses liters of solution, while molality uses kilograms of solvent. Molality is favored in experiments where temperature variations are significant, such as colligative property studies.
Example:
If 29.22 g of NaCl is dissolved in 100.0 g of water, what is the molality of the solution?
- Moles NaCl = 29.22 g / 58.44 g/mol = 0.5 mol
- Kilograms of water = 100.0 g / 1000 g/kg = 0.1 kg
- Molality = 0.5 mol / 0.1 kg = 5 m
Parts Per Million (PPM) and Parts Per Billion (PPB): Trace Concentrations
PPM and PPB are used to express extremely low concentrations, often encountered in environmental science and trace analysis. PPM represents parts of solute per million parts of solution, while PPB represents parts of solute per billion parts of solution.
Applications
These units are essential for quantifying pollutants in water or air, where the concentrations may be minute but still have significant environmental impacts.
Conversion
PPM and PPB can be converted to other concentration units using appropriate conversion factors. For dilute aqueous solutions, 1 PPM is approximately equal to 1 mg/L.
Example:
A water sample contains 2 PPM of lead. This means there are 2 mg of lead for every liter of water (approximately).
Mass of Solute per Volume of Solution
A simple and direct way to express concentration is as the mass of solute per volume of solution, commonly using units like grams per liter (g/L) or milligrams per milliliter (mg/mL).
Practical Usage
This method is straightforward and useful when the molar mass of the solute is not readily available or when a quick estimate of concentration is needed.
Example:
A solution contains 5 g of sugar in 2 liters of water. The concentration is 2.5 g/L.
Percent Concentration (% w/v, % v/v, % w/w)
Percent concentration expresses the amount of solute as a percentage of the total solution. There are three common types:
-
% w/v (weight/volume): Grams of solute per 100 mL of solution. This is commonly used for solutions where the solute is a solid and the solvent is a liquid.
-
% v/v (volume/volume): Milliliters of solute per 100 mL of solution. This is commonly used for solutions made by mixing two liquids.
-
% w/w (weight/weight): Grams of solute per 100 grams of solution. This is often used for solid mixtures.
Examples:
- A 5% w/v NaCl solution contains 5 grams of NaCl in every 100 mL of solution.
- A 70% v/v ethanol solution contains 70 mL of ethanol in every 100 mL of solution.
- A 2% w/w gold alloy contains 2 grams of gold in every 100 grams of the alloy.
By mastering these various units of concentration, you gain a powerful toolkit for accurately describing and manipulating solutions in your chemical endeavors. Understanding their nuances allows for precision in experimental design and data interpretation.
The Principles of Dilution: Reducing Concentration Effectively
Understanding the fundamental components of a solution is essential, but equally crucial is the ability to manipulate those solutions to achieve desired concentrations. This is where the principle of dilution comes into play. Dilution is a core technique in any scientific discipline that involves working with solutions, offering a practical means to tailor solutions to specific experimental needs. Let's explore this vital process.
Defining Dilution: Adding Solvent to Lower Concentration
At its heart, dilution is the process of decreasing the concentration of a solute in a solution. This is achieved by simply adding more solvent, thereby increasing the total volume of the solution while keeping the amount of solute constant.
Think of it like adding water to a strong juice concentrate – the overall amount of juice remains the same, but its intensity (concentration) diminishes as the volume increases. The key is that the amount of solute doesn't change; only its concentration relative to the total volume is altered.
Stock Solutions vs. Diluted Solutions: A Matter of Concentration
In any laboratory setting, you'll often encounter two terms: stock solution and diluted solution. Understanding the difference is crucial.
A stock solution is a concentrated solution prepared in advance. These are typically created at a higher concentration than needed for immediate use. Stock solutions save time and reduce errors since scientists can prepare a large batch and dilute it as needed.
A diluted solution, on the other hand, is the result of reducing the concentration of a stock solution by adding more solvent. This working solution is the one used in the actual experiment or application.
Identifying Stock and Diluted Solutions
- Stock Solution: High solute concentration; prepared in advance.
- Diluted Solution: Lower solute concentration; prepared from a stock solution by adding solvent.
The Importance of Dilution: Why We Dilute
Dilution is not just a convenient laboratory trick; it is a fundamental technique with far-reaching applications.
-
Achieving Optimal Concentrations: Many experiments and applications require specific solute concentrations that are often lower than those commercially available or easily prepared. Dilution allows us to fine-tune the solution to meet these precise requirements.
-
Conserving Resources: By preparing a stock solution, we can avoid wasting valuable solutes. Only the required amount of stock solution is used, minimizing overall consumption.
-
Improving Accuracy: Working with very small amounts of highly concentrated solutions can be challenging and prone to error. Diluting the solution can make it easier to measure and dispense accurately.
-
Creating Standard Curves: In analytical chemistry, dilutions are essential for creating standard curves, which are used to determine the concentration of unknown samples.
-
Titration: A laboratory method used to determine the unknown concentration of an identified analyte
In conclusion, understanding the principles of dilution is essential for anyone working in a quantitative science. It is a versatile and powerful technique that allows us to manipulate solutions with precision and efficiency.
The Dilution Equation: Mastering M1V1 = M2V2
Understanding the fundamental components of a solution is essential, but equally crucial is the ability to manipulate those solutions to achieve desired concentrations. This is where the principle of dilution comes into play. Dilution is a core technique in any scientific discipline that involves working with solutions, and at the heart of it lies a simple yet powerful equation: M1V1 = M2V2. Let's unpack this equation and explore how it can be used to master dilutions.
Unveiling the M1V1 = M2V2 Equation
The equation M1V1 = M2V2 (or alternatively, C1V1 = C2V2, where C represents concentration) is a cornerstone of dilution calculations. It expresses the relationship between the concentration and volume of a solution before and after dilution.
Let's break down each variable:
-
M1 (or C1): Represents the initial concentration of the stock solution before dilution. The concentration can be expressed in various units, such as molarity (M), molality (m), or even percentage concentration (%), as long as the units are consistent on both sides of the equation.
-
V1: Represents the initial volume of the stock solution that will be diluted. This volume can be in liters (L), milliliters (mL), or any other volume unit, but consistency with V2 is key.
-
M2 (or C2): Represents the final concentration of the solution after dilution. This is the desired concentration you are aiming for.
-
V2: Represents the final volume of the solution after dilution. This is the total volume of the diluted solution.
The beauty of this equation lies in its simplicity and broad applicability. It allows you to calculate any one of these variables if you know the other three. This makes it an indispensable tool for preparing solutions of desired concentrations.
Step-by-Step Examples of Dilution Calculations
Let's walk through a couple of examples to illustrate how to use the M1V1 = M2V2 equation in practice.
Example 1: Preparing a Dilute Solution from a Stock Solution
Problem: You have a stock solution of 1.0 M NaCl (sodium chloride), and you need to prepare 100 mL of a 0.1 M NaCl solution. What volume of the stock solution do you need to dilute?
Solution:
- Identify the knowns:
- M1 = 1.0 M (stock solution concentration)
- V2 = 100 mL (desired final volume)
- M2 = 0.1 M (desired final concentration)
- Identify the unknown: V1 (volume of stock solution needed)
-
Apply the equation: M1V1 = M2V2
(1.0 M) V1 = (0.1 M) (100 mL)
- Solve for V1: V1 = (0.1 M 100 mL) / 1.0 M = 10 mL
**
Answer: You need to dilute 10 mL of the 1.0 M NaCl stock solution with enough solvent (usually water) to bring the final volume to 100 mL.
Example 2: Calculating the Final Concentration After Dilution
Problem: You dilute 25 mL of a 2.0 M KCl (potassium chloride) solution to a final volume of 500 mL. What is the concentration of the diluted solution?
Solution:
- Identify the knowns:
- M1 = 2.0 M (stock solution concentration)
- V1 = 25 mL (volume of stock solution)
- V2 = 500 mL (final volume)
- Identify the unknown: M2 (final concentration)
-
Apply the equation: M1V1 = M2V2
(2.0 M) (25 mL) = M2 (500 mL)
- Solve for M2: M2 = (2.0 M 25 mL) / 500 mL = 0.1 M**
Answer: The concentration of the diluted KCl solution is 0.1 M.
Practice Problems to Sharpen Your Skills
To solidify your understanding of the dilution equation, try these practice problems:
- You need to prepare 250 mL of a 0.5 M glucose solution from a 2.0 M stock solution. What volume of the stock solution do you need?
- If you dilute 50 mL of a 4.0 M HCl solution to a final volume of 200 mL, what is the concentration of the diluted solution?
- You have a 10.0 M NaOH stock solution. How would you prepare 500 mL of a 0.25 M NaOH solution? Describe the steps.
By working through these examples and practice problems, you'll gain confidence in using the M1V1 = M2V2 equation and be well-equipped to tackle a wide range of dilution challenges in your scientific endeavors. Remember to always pay close attention to units and ensure consistency throughout your calculations.
Serial Dilution: A Step-by-Step Guide to Achieving Highly Diluted Solutions
Understanding the fundamental components of a solution is essential, but equally crucial is the ability to manipulate those solutions to achieve desired concentrations. This is where the principle of dilution comes into play. Dilution is a core technique in any scientific discipline that involves working with solutions, but sometimes, a single dilution is not enough. In situations where extremely low concentrations are needed, serial dilution becomes the go-to method.
Serial dilution is a stepwise dilution process where the stock solution is diluted multiple times in series. Instead of performing one large dilution, you create a series of smaller, sequential dilutions to achieve the desired final concentration. This method is particularly useful when dealing with concentrations that are too low to be accurately measured directly or when working with very small volumes.
Understanding Serial Dilution: The Step-by-Step Process
The beauty of serial dilution lies in its simplicity and precision. Each dilution step involves transferring a known volume of the previous dilution into a known volume of a solvent, typically a buffer or water. This process is then repeated multiple times until the desired concentration is reached.
-
Preparation: Gather your materials, including the stock solution, diluent (solvent), sterile tubes or vials, and calibrated pipettes. Make sure you have a clear understanding of the final concentration you need to achieve.
-
Calculate the Dilution Factor: Determine the dilution factor for each step. The dilution factor is the ratio of the final volume to the initial volume. For example, a 1:10 dilution means that 1 part of the solution is added to 9 parts of the diluent, resulting in a total of 10 parts.
-
Perform the First Dilution: Transfer the calculated volume of the stock solution to the first tube containing the diluent. Mix thoroughly to ensure a homogeneous solution. This is your first diluted solution.
-
Repeat the Dilution: Take the calculated volume of the first diluted solution and transfer it to the next tube containing the diluent. Again, mix thoroughly. This is your second dilution.
-
Continue the Process: Repeat step 4 for the remaining tubes, each time transferring a portion of the previous dilution into the next tube with the diluent.
-
Final Solution: The final tube will contain the desired, highly diluted solution. Remember to clearly label each tube with its dilution factor for easy identification.
Calculating Dilution Factors
Calculating the dilution factor at each step is crucial for achieving the desired final concentration. The overall dilution factor for the entire serial dilution is the product of the dilution factors for each individual step.
For example, if you perform three 1:10 dilutions, the overall dilution factor is 10 x 10 x 10 = 1000, resulting in a 1:1000 dilution. Keeping track of these calculations ensures that you reach the target concentration with accuracy.
Applications of Serial Dilution
Serial dilution is a fundamental technique with diverse applications across various scientific disciplines. Here are some notable examples:
Microbiology: Colony Counting
In microbiology, serial dilutions are essential for enumerating bacteria or other microorganisms in a sample. A series of dilutions is performed, and then a known volume of each dilution is plated onto agar plates.
After incubation, the number of colonies that grow on each plate is counted. By multiplying the colony count by the appropriate dilution factor, the original concentration of microorganisms in the sample can be determined.
Biochemistry: Enzyme Assays
In biochemistry, serial dilutions are often used to prepare standard curves for enzyme assays. By diluting a known concentration of a substrate or product, a series of solutions with decreasing concentrations can be created. These solutions are then used to calibrate the assay and determine the concentration of the analyte in an unknown sample.
Other Applications
Beyond these common applications, serial dilution is also used in:
-
Cell Culture: Preparing dilutions of growth factors or other supplements.
-
Pharmacology: Determining the effective dose of a drug.
-
Environmental Science: Measuring pollutant concentrations in water samples.
Serial dilution is a powerful and versatile technique that allows scientists to work with extremely low concentrations accurately and efficiently. Whether you are counting bacteria, performing enzyme assays, or preparing solutions for other experiments, mastering serial dilution is a valuable skill for any scientist.
Essential Equipment for Accurate Dilutions: Volumetric Flasks, Pipettes, and More
Serial dilution: A step-by-step guide to achieving highly diluted solutions. Understanding the fundamental components of a solution is essential, but equally crucial is the ability to manipulate those solutions to achieve desired concentrations. This is where the principle of dilution comes into play. Dilution is a core technique in any scientific discipline, and its success hinges on the correct selection and use of laboratory equipment. Using the right tools ensures accuracy and precision, leading to reliable experimental results.
The Indispensable Volumetric Flask
Volumetric flasks are the cornerstone of accurate solution preparation. These flasks are specifically calibrated to contain a precise volume at a specific temperature, usually marked on the flask.
Their primary use is to create standard solutions, where the concentration is known with a high degree of certainty.
Unlike other glassware, volumetric flasks are designed for one specific volume, ensuring minimal error when preparing your solutions.
Mastering the Meniscus
A crucial aspect of using a volumetric flask is accurately reading the meniscus. The meniscus is the curve formed at the surface of a liquid in a container. For most aqueous solutions, it is concave.
Always read the meniscus at eye level, with the bottom of the meniscus just touching the calibration mark on the flask. This minimizes parallax errors and ensures accurate volume measurement.
It's best to add the solvent to just below the calibration mark, then use a dropper to carefully add the final amount until the meniscus is perfectly aligned.
Precision Delivery with Pipettes
Pipettes are essential for accurately transferring small volumes of liquid. Different types of pipettes offer varying levels of precision and are suited for different applications.
Volumetric Pipettes: The Gold Standard for Transfer
Volumetric pipettes, also known as transfer pipettes, are designed to deliver a single, precise volume. They are highly accurate and ideal for transferring known volumes when preparing dilutions.
Like volumetric flasks, volumetric pipettes are calibrated to deliver a specific volume, making them invaluable for quantitative work.
Graduated Pipettes: Versatility and Measurement
Graduated pipettes, also known as measuring pipettes, allow for the delivery of variable volumes. They have markings along their length to indicate different volumes, offering more flexibility than volumetric pipettes.
While versatile, graduated pipettes are generally less accurate than volumetric pipettes, so consider this when performing more sensitive work.
Micropipettes: Mastering the Microliter
For very small volumes, micropipettes are indispensable. These pipettes are designed to accurately measure and dispense volumes in the microliter range (µL).
Micropipettes are crucial in molecular biology, biochemistry, and other fields where small volumes are common.
Proper technique, including selecting the correct pipette for the volume needed and using the appropriate tips, is essential for accurate measurements.
Graduated Cylinders: A Useful, But Less Precise, Alternative
Graduated cylinders are useful for measuring approximate volumes when high accuracy is not required. They are more accurate than beakers or Erlenmeyer flasks but less accurate than volumetric flasks or pipettes.
While they are convenient for quickly measuring liquids, their wider bore and less precise markings make them unsuitable for preparing standard solutions or dilutions requiring high accuracy.
Beakers and Erlenmeyer Flasks: For Mixing, Not Measuring
Beakers and Erlenmeyer flasks are useful for mixing and holding solutions, but they are not designed for accurate volume measurement. The volume markings on these containers are approximate and should not be relied upon for quantitative work.
These flasks are ideal for carrying out reactions or preparing solutions before transferring them to more accurate measuring devices.
Accuracy, Precision, and Error Analysis in Dilutions
Essential Equipment for Accurate Dilutions: Volumetric Flasks, Pipettes, and More Serial dilution: A step-by-step guide to achieving highly diluted solutions. Understanding the fundamental components of a solution is essential, but equally crucial is the ability to manipulate those solutions to achieve desired concentrations. This is where the principles of accuracy, precision, and error analysis become paramount, acting as cornerstones for reliable experimental outcomes.
Defining Accuracy and Precision
In the realm of quantitative chemistry, accuracy and precision are often used interchangeably, but they represent distinct concepts. Accuracy refers to the closeness of a measurement to the true or accepted value. A highly accurate dilution will result in a solution concentration that closely matches the intended concentration.
Precision, on the other hand, reflects the repeatability or reproducibility of a measurement. High precision indicates that repeated dilutions, performed identically, will yield concentrations that are very close to each other, regardless of whether they are close to the true value.
It's crucial to strive for both accuracy and precision in dilution experiments, as one without the other can lead to misleading results.
Identifying Sources of Error
Even with meticulous technique, errors can creep into dilution experiments, affecting the accuracy and precision of the final solution. Recognizing and understanding these potential sources of error is the first step toward minimizing their impact.
Equipment Limitations
The tools we use can significantly influence the outcome of a dilution. For example, pipettes that are not properly calibrated can deliver inaccurate volumes, leading to concentration errors. Similarly, volumetric flasks with damaged or misread markings can introduce volume inaccuracies. Regularly check and calibrate equipment to ensure it meets the required specifications.
Technique-Related Errors
Human error is another significant contributor to inaccuracies in dilutions. Parallax error, which occurs when the meniscus of a liquid is not read at eye level, can lead to incorrect volume measurements. Furthermore, inconsistent mixing can result in a non-homogeneous solution, where the concentration varies throughout the volume. Careful attention to detail and consistent technique are essential for minimizing these errors.
Other procedural issues also contribute to technique-related errors. Ensure the solute is completely dissolved before the final volume adjustment. Also, avoid introducing contaminants.
Environmental Factors
Environmental factors, though less direct, can still influence dilution accuracy. Temperature fluctuations can affect the volume of liquids. This is why it's important to perform dilutions at a controlled temperature or account for thermal expansion.
Minimizing Errors for Reliable Results
Minimizing errors requires a multi-faceted approach, combining best practices, meticulous technique, and careful error mitigation.
Using Calibrated Equipment
One of the simplest and most effective ways to reduce errors is to use calibrated equipment. Regularly check the calibration of pipettes, volumetric flasks, and other measuring devices, and recalibrate or replace them as needed.
Certified reference materials (CRMs) are important for calibrating analytical instruments and assessing the accuracy of measurement procedures.
Practicing Proper Techniques
Mastering proper laboratory techniques is crucial for accurate dilutions. Always read the meniscus at eye level to avoid parallax error. Ensure thorough mixing of the solution after each addition of solvent. Use appropriate pipetting techniques to deliver accurate volumes.
Performing Replicate Measurements
Performing replicate measurements can help to identify and quantify random errors. By performing multiple dilutions and measuring the resulting concentrations, you can calculate the standard deviation and assess the precision of your technique. Outliers can then be identified and investigated.
In summary, achieving reliable results in dilution experiments demands a rigorous approach, encompassing a thorough understanding of accuracy and precision, a meticulous attention to detail, and a proactive effort to minimize potential sources of error. By adopting these principles, scientists can enhance the quality and trustworthiness of their experimental findings.
Real-World Applications of Dilutions and Concentrations
Understanding the fundamental components of a solution is essential, but equally crucial is the ability to manipulate those solutions to a desired concentration. The principles of dilutions and concentrations extend far beyond the laboratory bench, permeating diverse fields and playing critical roles in countless real-world applications. Let's explore how these concepts translate into tangible impacts across various scientific disciplines and industries.
Chemistry: The Foundation of Quantitative Analysis
In both general and analytical chemistry, the mastery of dilutions and concentrations is paramount. The preparation of reagents, standard solutions, and titrants hinges on precise calculations and execution.
For example, quantitative analysis relies on accurately known concentrations to determine the amount of a specific analyte in a sample. Spectrophotometry, chromatography, and titrations all depend on the meticulous preparation of solutions with precisely defined concentrations.
Biology and Microbiology: Cultivating and Quantifying Life
Biology and microbiology heavily rely on dilutions for a multitude of applications. From preparing cell cultures to diluting reagents for assays, the ability to manipulate concentrations is indispensable.
Serial dilutions are particularly vital in microbiology for accurately counting bacterial colonies. This technique allows scientists to estimate the number of viable cells in a sample by systematically reducing the concentration and plating manageable quantities.
In molecular biology, dilutions are critical for preparing DNA and protein samples for analysis. Accurate dilutions are necessary for techniques like PCR (Polymerase Chain Reaction) and ELISA (Enzyme-Linked Immunosorbent Assay), ensuring reliable and reproducible results.
Pharmacy and Medicine: Precision for Patient Safety
The pharmaceutical and medical fields demand the utmost precision in preparing medications and intravenous solutions. The correct dosage is paramount for patient safety and treatment efficacy.
Dilutions play a crucial role in ensuring accurate drug concentrations. Pharmacists meticulously prepare medications to meet specific dosage requirements, often requiring multiple dilutions to achieve the desired concentration.
Intravenous solutions, such as saline and glucose solutions, also require precise dilutions. These solutions must be carefully prepared to maintain the correct electrolyte balance and osmotic pressure to prevent adverse effects on patients.
Environmental Science: Monitoring and Protecting Our Planet
Environmental science utilizes dilutions extensively in the analysis of water, soil, and air samples. Determining the concentrations of pollutants, toxins, and other substances is essential for monitoring environmental quality and protecting public health.
Dilution is a critical step in preparing samples for analysis using techniques such as spectroscopy and chromatography.
These techniques are used to measure the concentrations of various contaminants, including heavy metals, pesticides, and organic pollutants.
By understanding the concentrations of these substances, environmental scientists can assess the impact of pollution on ecosystems and develop strategies for remediation.
Video: How Does Dilution Reduce Concentration? Guide

FAQs: How Does Dilution Reduce Concentration? Guide
What is the basic principle behind dilution?
Dilution involves adding more solvent to a solution. This increases the total volume while the amount of solute remains constant. Since concentration is the amount of solute per unit volume, how does dilution reduce concentration? It does so by spreading the same amount of solute across a larger volume.
Can I dilute a solution indefinitely?
Theoretically, yes, you can keep adding solvent. However, at extremely low concentrations, the solute's impact becomes negligible. Practically, there's a point where further dilution has minimal effect on the solution's properties. How does dilution reduce concentration at this point? It reaches a near-zero value.
Is dilution the same as evaporation?
No. Evaporation removes solvent, increasing the concentration. Dilution adds solvent, decreasing the concentration. They are opposite processes. Therefore, how does dilution reduce concentration? By introducing more solvent, contrasting with evaporation's removal of it.
What's the relationship between initial and final concentrations during dilution?
The key formula is C1V1 = C2V2. C1 and V1 are the initial concentration and volume, while C2 and V2 are the final concentration and volume after dilution. This equation shows how does dilution reduce concentration. By increasing V2, C2 must decrease proportionally, assuming C1 and V1 remain constant.
So, there you have it! Hopefully, this guide demystified how does dilution reduce concentration and gave you a clearer picture of the science behind it. Now you're armed with the knowledge to tackle your next dilution experiment with confidence. Happy diluting!