Unlock Japanese: Add Furigana in Word Like a Pro! (Easy)
Learning Japanese can be significantly smoother when you utilize resources like Microsoft Word, especially when tackling complex kanji. Furigana, the phonetic guides written above kanji, are essential for comprehension, and knowing how to add furigana in Word is a game-changer. In fact, educational institutions specializing in Japanese Language Proficiency Test (JLPT) preparation often recommend mastering this technique. This is because this enables students of all levels to easily access texts that would otherwise require lookups and a deeper knowledge of the Japanese writing system. Knowing how to add furigana in Word makes reading easier.

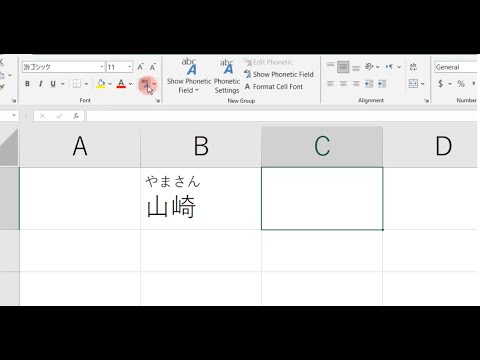
Image taken from the YouTube channel Hean Shared , from the video titled How to put Furigana in Japanese in Word 2010 .
The Japanese language, with its intricate writing system, can present a significant hurdle for new learners and even seasoned linguists. Among its unique challenges, Kanji, the adopted Chinese characters, often stand out as particularly daunting.
These characters, each representing a word or concept, require rote memorization and nuanced understanding to master.
For those embarking on their Japanese language journey, or even those navigating texts with uncommon Kanji, a powerful tool exists: Furigana.
Furigana, the small Hiragana characters placed above or alongside Kanji, act as phonetic guides, providing the pronunciation of the character. This instantly unlocks the meaning and reading of the text, allowing learners to focus on comprehension rather than struggling with unfamiliar characters.
Why Furigana Matters
Furigana isn't just for beginners. It plays a vital role in a variety of situations:
- Learning Support: By providing instant pronunciation, Furigana removes a significant barrier to entry for new learners. It allows them to engage with authentic Japanese content sooner.
- Navigating Uncommon Kanji: Even native speakers encounter Kanji they don't recognize. Furigana serves as a helpful reminder, ensuring smooth reading.
- Accessibility: Furigana makes Japanese texts more accessible to a wider audience, including those with learning differences or visual impairments.
Your Guide to Effortless Furigana in Word
This article serves as your definitive guide to adding Furigana in Microsoft Word. We will explore the built-in features and offer alternative methods to seamlessly integrate this invaluable reading aid into your Japanese documents.
Whether you're a student, teacher, or simply an enthusiast, mastering Furigana in Word will significantly enhance your ability to create, share, and understand Japanese content.
Our simple, step-by-step instructions will empower you to unlock the full potential of Japanese reading and writing within the familiar environment of Microsoft Word.
Furigana's ability to unlock the pronunciation of complex characters allows students and enthusiasts alike to navigate Japanese texts with greater confidence. This feature isn't just a crutch for beginners; it's a legitimate tool used in publications designed for a wide range of readers. But to truly appreciate the power of Furigana, it's important to understand its place within the broader context of the Japanese writing system.
Understanding Furigana: Your Key to Japanese Literacy
At its core, Furigana (振り仮名) is a phonetic guide. It's a reading aid that clarifies the pronunciation of Japanese characters, primarily Kanji. These small Hiragana characters are typically placed above horizontal text or to the right of vertical text.
Furigana provides the reading, or pronunciation, of the associated Kanji. Think of it as a built-in pronunciation key, eliminating guesswork and allowing readers to focus on comprehension.
The Role of Furigana: Bridging the Literacy Gap
Furigana plays a crucial role in making Japanese accessible. It removes a significant barrier for Japanese learners. It allows them to engage with authentic materials from an earlier stage.
However, its usefulness extends far beyond the classroom. Even native Japanese speakers encounter unfamiliar or rarely used Kanji. Furigana ensures smooth reading and understanding in these situations, appearing in newspapers, books, and manga targeting a broad audience.
Essentially, Furigana bridges the literacy gap, making complex texts accessible to a wider range of readers, regardless of their language proficiency.
Demystifying the Japanese Writing System
Understanding Furigana requires a basic grasp of the three scripts used in Japanese writing:
-
Hiragana: A phonetic script where each character represents a syllable. It is primarily used for native Japanese words and grammatical particles.
-
Katakana: Another phonetic script, mainly used for foreign loanwords, onomatopoeia, and emphasis.
-
Kanji: Logographic characters adopted from Chinese. Each Kanji represents a word or concept.
Kanji can have multiple readings (pronunciations), depending on the context. This is where Furigana becomes invaluable. It provides the correct reading for a specific instance of a Kanji character.
Think of Furigana as a translator, converting the visual complexity of Kanji into the phonetic simplicity of Hiragana.
Phonetic Guides: Beyond Furigana
While Furigana is the most common phonetic guide in Japanese, it's important to acknowledge other related concepts.
Ruby characters, as they are sometimes called in typesetting, is a broader term for small annotation characters placed alongside text.
Ultimately, all these phonetic guides serve the same purpose: to assist pronunciation and comprehension, making written language more accessible.
Demystifying the Japanese Writing System has hopefully shed light on the complexities Furigana is designed to alleviate. But before diving into the practical steps of adding Furigana, we must ensure that our digital canvas – Microsoft Word – is properly prepared. This foundational step ensures compatibility and unlocks the full potential of Word's Furigana features.
Preparing Microsoft Word: Ensuring Compatibility
Before embarking on the journey of adding Furigana to your Japanese documents, it's crucial to verify that your version of Microsoft Word is properly configured to support Japanese text and Furigana functionality. This initial setup is paramount for a seamless and frustration-free experience. Think of it as laying the groundwork for a beautiful and accurate representation of Japanese text.
Verifying Microsoft Word Compatibility
Not all versions of Microsoft Word are created equal when it comes to handling Asian languages. It's essential to confirm that your version of Word, typically part of the Microsoft Office Suite, includes the necessary features for displaying and editing Japanese text, including Furigana.
To verify compatibility, check your Word version information. This is usually found under the "About Microsoft Word" or "Account" section within the "File" menu. Generally, recent versions of Word (2010 and later) have robust support for Asian languages. However, it is worth confirming.
If you are using an older version, consider upgrading to a newer version to ensure full Furigana functionality. If upgrading isn't an option, there might be compatibility packs available from Microsoft that can add support for East Asian languages.
Addressing Japanese Language Settings
Even with a compatible version of Word, proper Japanese language support needs to be enabled within the application itself. This involves configuring your language preferences and keyboard settings to accurately input and display Japanese characters.
Installing the Japanese Language Pack
First, ensure that the Japanese language pack is installed on your operating system. In Windows, this can be done through the "Language" settings in the Control Panel or Settings app. Adding Japanese as a language will allow your computer to properly render Japanese fonts and characters.
Enabling Japanese Input Method Editor (IME)
The Japanese IME is crucial for typing Japanese characters. It allows you to input Hiragana, Katakana, and Kanji. Activating the IME typically involves adding a Japanese keyboard layout to your system’s input methods. The specific steps may vary slightly depending on your operating system (Windows or macOS).
Once enabled, you'll usually see an indicator on your taskbar or menu bar that allows you to switch between different input languages and modes (e.g., English, Japanese).
Setting Word's Language Preferences
Finally, within Microsoft Word itself, navigate to "File" > "Options" > "Language". Here, ensure that Japanese is listed as one of your preferred editing languages. You can also set Japanese as the default language for new documents if you primarily work with Japanese text.
By carefully addressing these compatibility and language settings, you'll create an optimal environment for adding and manipulating Furigana within your Microsoft Word documents. This preparation prevents potential display issues or input errors, paving the way for a smooth and efficient Furigana implementation process.
Demystifying the Japanese Writing System has hopefully shed light on the complexities Furigana is designed to alleviate. But before diving into the practical steps of adding Furigana, we must ensure that our digital canvas – Microsoft Word – is properly prepared. This foundational step ensures compatibility and unlocks the full potential of Word's Furigana features.
Step-by-Step Guide: Adding Furigana in Microsoft Word - The Definitive Walkthrough
Adding Furigana in Microsoft Word doesn’t have to be a daunting task. With a clear understanding of the tools available, you can seamlessly integrate this invaluable reading aid into your documents. This section will provide a detailed, actionable guide, covering both the built-in Furigana feature and alternative methods to achieve the same result.
Using the Built-in Furigana Feature
Microsoft Word offers a built-in function specifically designed for adding Furigana, also known as ruby characters. This method provides a controlled and customizable way to annotate Japanese text.
Selecting the Text
The first step is to select the specific Japanese text, especially the Kanji characters, to which you want to add Furigana. Use your mouse or keyboard to highlight the desired characters. Precision is key here. Ensure you're only selecting the Kanji and not any surrounding Hiragana or Katakana, unless Furigana is also needed for those.
Accessing the Furigana Dialog Box
Accessing the Furigana feature requires navigating to the Asian Typography settings within Word. The exact steps may vary slightly depending on your Word version, but the general process is as follows:
- Go to the "Home" tab on the Ribbon.
- Look for the "Font" group.
- Click on the small arrow in the lower-right corner of the "Font" group to open the Font dialog box.
- Navigate to the "Advanced" tab.
- In the "OpenType features" section, locate "Ruby" or "Furigana" option.
- Select "Ruby" or "Furigana."
This will open the Furigana dialog box, where you can input and customize the pronunciation.
Entering the Pronunciation
Within the Furigana dialog box, you'll find a field to enter the Hiragana pronunciation for the selected Kanji. Accuracy is paramount here. Ensure you're using the correct reading for the context of the word. Use your Japanese Input Method Editor (IME) to type the Hiragana. If you're unsure of the pronunciation, consult a dictionary or online resource.
Once entered, Word will automatically position the Hiragana above the corresponding Kanji. Double-check that the Furigana aligns correctly and represents the intended pronunciation.
Customizing Appearance
The Furigana dialog box often provides options for customizing the appearance of the ruby characters. You might be able to adjust the size, font, and alignment of the Furigana. Experiment with these settings to achieve optimal readability.
Consider the overall aesthetic of your document and choose a style that complements the surrounding text. Typically, a slightly smaller font size is used for Furigana to avoid overcrowding the text. Ensure your chosen style doesn't compromise the legibility of the base characters or the Furigana.
Alternative Methods (If Applicable)
While the built-in Furigana feature is generally the most reliable method, alternative approaches exist. These can be useful in specific situations or when dealing with compatibility issues.
Using IME (Input Method Editor)
Some Japanese Input Method Editors (IMEs) offer functionality to generate Furigana suggestions automatically. As you type, the IME might provide options to convert Kanji characters along with their corresponding Furigana.
This method can be faster than manually inputting Furigana, but it’s crucial to verify the IME’s suggestions. Automatic Furigana generation isn't always accurate, especially with less common words or nuanced readings. Always double-check the pronunciation.
Copy-Pasting Furigana from Online Sources
In some cases, you might find documents or websites that already have Furigana added to Japanese text. It can be tempting to copy and paste this text directly into your Word document.
While this can be a quick solution, exercise extreme caution. Ensure that you are respecting copyright and licensing restrictions. Verify the accuracy of the Furigana. Not all online sources are reliable, and copied Furigana might contain errors.
Furthermore, be aware that formatting inconsistencies can arise when copying and pasting text from different sources. You may need to adjust the font, size, and alignment of the Furigana to match the rest of your document. When choosing a font, consider fonts that are compatible with Japanese characters. Ultimately, verifying the accuracy and ensuring appropriate usage of content from an outside source is crucial.
Demystifying the Japanese Writing System has hopefully shed light on the complexities Furigana is designed to alleviate. But before diving into the practical steps of adding Furigana, we must ensure that our digital canvas – Microsoft Word – is properly prepared. This foundational step ensures compatibility and unlocks the full potential of Word's Furigana features.
Adding Furigana in Microsoft Word doesn’t have to be a daunting task. With a clear understanding of the tools available, you can seamlessly integrate this invaluable reading aid into your documents. Now that we've laid the groundwork for how to insert Furigana, let's explore methods to elevate your efficiency and precision.
Tips and Tricks: Mastering Furigana Efficiency
Adding Furigana can become a seamless process with the right strategies. This section unveils several tips and tricks designed to boost your workflow, minimize errors, and ensure a polished final product. From leveraging keyboard shortcuts to understanding common pitfalls, these insights will help you master the art of Furigana in Microsoft Word.
Harnessing the Power of Keyboard Shortcuts
Efficiency is often found in the simplest of tools. Keyboard shortcuts are your allies in streamlining repetitive tasks, and adding Furigana is no exception. While a dedicated Furigana shortcut might not exist by default in Word, there are still effective strategies to consider.
Consider these potential approaches:
-
Custom Shortcuts: Explore Word's customization options to assign a keyboard shortcut to access the "Phonetic Guide" feature directly. This involves navigating to the "Customize Ribbon" section in Word's options and assigning a key combination to the desired command.
-
Macro Recording: For more complex or repetitive Furigana tasks, consider recording a macro. A macro automates a series of actions, allowing you to execute them with a single keystroke. This can be particularly useful if you frequently apply the same Furigana settings to specific types of text.
-
Leverage IME Shortcuts: Your Input Method Editor (IME) likely has its own set of shortcuts for switching between Hiragana, Katakana, and Roman characters. Mastering these shortcuts is crucial for quickly and accurately inputting Furigana readings.
Avoiding Common Furigana Pitfalls
Even with the best intentions, mistakes can happen. Here are some common pitfalls to watch out for when adding Furigana, along with guidance on how to avoid them.
-
Pronunciation Accuracy: Double-check the pronunciation of each Kanji before adding Furigana. Relying solely on automated suggestions can lead to errors. Consult a reliable Japanese dictionary or native speaker if you're unsure. Always verify the suggested reading with credible resources.
-
Placement Precision: Ensure that the Furigana is precisely aligned above the corresponding Kanji characters. Misaligned Furigana can disrupt readability and create a visually jarring effect. Word's formatting options can help fine-tune the placement.
-
Over-Furigana-ization: Resist the urge to add Furigana to every single Kanji character, especially for common words that most readers are likely to know. Overuse can clutter the text and detract from the reading experience. Exercise restraint and target less common or more complex Kanji.
The Cardinal Rule: Consistency is Key
Consistency is paramount in creating professional and readable documents. When it comes to Furigana, maintaining a uniform style and approach is crucial.
Consider these aspects of consistency:
-
Font and Size: Choose a font and size for your Furigana that complements the main text and ensures readability. Stick to this choice throughout the document.
-
Placement Style: Whether you prefer centered or left-aligned Furigana, maintain that style consistently.
-
Selective Use: Establish clear guidelines for when and where you will use Furigana. Will you annotate all Kanji in a document, or only those above a certain difficulty level? Adhering to a consistent policy will enhance the overall quality of your work.
By incorporating these tips and tricks, you can transform the process of adding Furigana from a chore into a streamlined and efficient workflow. Mastering these techniques will not only save you time but also elevate the quality and readability of your Japanese documents.
Advanced Customization: Fine-Tuning Furigana for Professional Results
While simply adding Furigana to Japanese text dramatically improves accessibility, the default settings might not always yield the most polished or readable outcome. To achieve truly professional results, delve into the advanced customization options available within Microsoft Word's Asian Typography features. This allows for meticulous control over the appearance and positioning of Furigana, ensuring optimal readability and aesthetic integration within your documents.
Fine-Tuning Ruby Characters: Positioning and Font
The default placement and font of Furigana might not always be ideal. Perhaps the characters are too close to the Kanji, making them appear cluttered, or the font size is disproportionate, hindering readability. Thankfully, Word provides granular control over these aspects.
Adjusting Character Positioning
Experiment with adjusting the horizontal and vertical positioning of the Ruby characters. Subtle shifts can significantly improve the visual harmony between the Kanji and its Furigana. Consider these options:
-
Kerning: Adjust the spacing between individual Furigana characters to enhance readability.
-
Baseline Shift: Fine-tune the vertical position of the Furigana relative to the Kanji.
Optimizing Font Settings
The choice of font and its size play a crucial role in Furigana's legibility.
-
Font Selection: Opt for a clear, legible Hiragana font that complements the main text. Avoid overly ornate or stylized fonts that might be difficult to read at smaller sizes.
-
Font Size: Experiment with different font sizes to find the sweet spot where the Furigana is easily readable without overwhelming the Kanji. A slightly smaller font size than the main text is often preferred.
-
Font Weight: Adjust the font weight (e.g., bold, light) to enhance clarity and visual contrast.
Mastering Asian Typography Features for Precise Spacing and Alignment
Microsoft Word's Asian Typography settings offer a wealth of options for precise control over spacing and alignment, allowing you to fine-tune the relationship between the Kanji and Furigana.
Leveraging Character Spacing
Adjusting character spacing can significantly impact the readability and visual appeal of Furigana.
- Expansion/Compression: Slightly expanding or compressing the Furigana can help it align more effectively with the width of the corresponding Kanji.
Utilizing Alignment Options
Word provides several alignment options for Furigana, allowing you to control its horizontal positioning relative to the Kanji.
-
Centered: The most common setting, centering the Furigana above the Kanji.
-
Left/Right Aligned: Useful in specific contexts where precise alignment with surrounding text is required.
Creating Custom Furigana Styles for Project-Specific Needs
For projects that demand a consistent and polished look, creating custom Furigana styles is invaluable. This allows you to define a set of formatting rules that can be applied quickly and easily to any selected text.
Defining Style Attributes
When creating a custom Furigana style, consider the following attributes:
-
Font: Specify the desired Hiragana font for Furigana.
-
Size: Set the optimal font size for readability.
-
Position: Define the preferred horizontal and vertical positioning.
-
Spacing: Adjust character spacing for optimal alignment.
Applying and Modifying Styles
Once created, custom Furigana styles can be easily applied to selected text through Word's Styles pane. You can also modify existing styles to adapt to changing project requirements. This ensures consistency and saves time when working on large documents.
By mastering these advanced customization techniques, you can elevate your Furigana implementation from basic functionality to a refined art form, enhancing the readability and professionalism of your Japanese documents.
Troubleshooting: Resolving Common Furigana Issues
Even with a clear understanding of how to implement Furigana, you might encounter unforeseen issues. This section provides solutions for common problems, ensuring a smooth and frustration-free experience.
Furigana Display Problems
One of the most frustrating issues is when Furigana simply doesn't display correctly. This can manifest in several ways, such as garbled characters, boxes instead of Hiragana, or the Furigana appearing in the wrong font. Often, this stems from underlying font or encoding problems.
Font Issues and Solutions
The first step is to ensure you have a suitable Japanese font installed on your system. Microsoft Word typically defaults to a compatible font, but it's worth verifying.
- Checking Font Compatibility: Navigate to your font settings and confirm the presence of a Japanese font like MS Gothic or MS Mincho.
- Changing the Font: Within the Furigana dialog box (Asian Typography settings), you can manually specify the font used for the Ruby characters. Experiment with different fonts to see if one renders correctly.
Encoding Problems and Solutions
Character encoding dictates how text is represented digitally. If the encoding is incorrect, Japanese characters, including Furigana, might not display properly.
- Saving as UTF-8: When saving your document, ensure you select UTF-8 encoding. This is the most widely compatible encoding for Japanese and other Unicode characters.
- Checking Document Encoding: In some cases, the document itself might be encoded incorrectly. While Word usually handles this automatically, you can use a text editor to check and convert the encoding if necessary.
Addressing Pronunciation Errors
Manually entering Furigana opens the door for potential pronunciation errors. Mistyping Hiragana or misunderstanding the correct reading of a Kanji can lead to inaccuracies.
Verifying Furigana Accuracy
Always double-check the Furigana you've entered against a reliable source. Several online dictionaries and resources can help you confirm the correct pronunciation of Kanji.
Utilizing Online Resources
- Online Dictionaries: Websites like Jisho.org or Wiktionary provide detailed information about Kanji, including their readings and example sentences.
- Native Speaker Verification: If possible, ask a native Japanese speaker to review your document and verify the accuracy of the Furigana.
Correcting Mistakes
If you identify an error, simply re-access the Furigana dialog box and edit the Hiragana accordingly. Careful attention to detail is crucial when dealing with pronunciation.
Resolving Compatibility Issues
Older versions of Microsoft Word might not fully support Furigana or the advanced Asian Typography features. This can lead to display problems or limited customization options.
Identifying Compatibility Problems
If you're working with an older version of Word, you might notice that the Furigana feature is missing or doesn't function as expected.
Workarounds for Older Versions
While upgrading to the latest version of Word is the ideal solution, here are some workarounds for older versions:
- Copy-Pasting Furigana: You can copy Furigana from online sources and paste it directly above the Kanji. However, this method can be time-consuming and might not maintain consistent formatting.
- Using Text Boxes: Insert text boxes above the Kanji and manually type the Hiragana pronunciation. This offers more control over positioning but requires significant manual effort.
It's crucial to remember that these workarounds might not be as seamless as using the built-in Furigana feature in newer versions of Word. They may also present further formatting challenges.
By addressing these potential problems proactively, you can ensure a smooth and effective experience when using Furigana in Microsoft Word.
Video: Unlock Japanese: Add Furigana in Word Like a Pro! (Easy)
FAQs: Adding Furigana in Word
Here are some common questions about adding furigana to Japanese text in Microsoft Word. We hope these answers clarify the process and help you use furigana effectively.
Is it really that easy to add furigana in Word?
Yes, Word has a built-in feature that makes it relatively easy to add furigana, also known as ruby characters, to kanji. Following the steps outlined in this article will guide you through the process of how to add furigana in Word quickly.
Can I control the appearance of the furigana?
Absolutely! After selecting the kanji and using the "Phonetic Guide" feature, you can adjust the alignment, font size, and even the specific hiragana displayed. This gives you precise control over how to add furigana in Word to suit your needs.
What if Word doesn't automatically suggest the correct furigana?
Word sometimes gets the reading wrong. No problem! You can manually edit the furigana in the "Phonetic Guide" window. Simply type in the correct reading. This ensures accurate furigana for all your Japanese text when you how to add furigana in Word.
Does adding furigana in Word affect the searchability of the document?
Yes, in most cases, both the kanji and the furigana will be searchable. This means that if someone searches for either the kanji or the hiragana reading, your document should appear in the search results. The functionality helps you when you how to add furigana in Word, your document remains easily accessible and searchable.